

Learning EKS Auto Mode helps you focus on your applications instead of cluster operations — it automatically manages compute, scaling, and placement, even for GPU workloads. You’ll gain the ability to run AI/ML and high-performance workloads on AWS with zero infrastructure management and optimal cost efficiency.
📚 Key Learnings
- Understand what EKS Auto Mode is and how it simplifies cluster management.
- Learn how EKS Auto Mode automatically provisions compute, storage, and networking resources — no node groups required.
- Explore EKS Auto Mode GPU support for ML/AI and deep learning workloads.
- Learn how EKS Auto Mode integrates with Karpenter under the hood.
🧠 Learn here
What is EKS Auto Mode?
Amazon Elastic Kubernetes Service (EKS) Auto Mode is a new operational mode of EKS that automates key aspects of cluster and infrastructure management.
It simplifies running Kubernetes on AWS by provisioning, scaling, and managing compute resources automatically, allowing developers to focus on deploying and running workloads without managing nodes or infrastructure details.
Key Concepts
EKS Auto Mode removes the manual overhead of configuring node groups, scaling policies, and networking setup. It integrates deeply with AWS managed services to handle the underlying compute lifecycle, networking, and security automatically.
1. Fully Managed Compute
- No need to manually manage EC2 instances or node groups.
- EKS automatically provisions and scales compute resources to match pod requirements.
- Supports various workload types, including CPU, GPU, and memory-optimized pods.
2. Simplified Networking and Security
- Auto Mode configures networking, subnets, and security groups automatically.
- Integrates with AWS VPC CNI for seamless pod networking.
- Supports IAM roles for service accounts (IRSA) to control access securely.
3. Optimized Scaling and Cost Efficiency
- Automatically scales pods and nodes based on workload demand.
- Leverages best compute options for optimal cost-performance balance.
- Eliminates over-provisioning by dynamically allocating only the required resources.
4. Zero Node Management
- Focus solely on deploying Kubernetes applications using standard manifests.
- AWS handles node patching, upgrading, and scaling automatically.
- Ideal for teams who want the benefits of Kubernetes without the operational complexity.
Benefits
| Benefit | Description |
|---|---|
| Ease of Use | Reduces Kubernetes setup complexity with automated infrastructure provisioning. |
| Scalability | Automatically scales workloads up or down based on demand. |
| Cost Efficiency | Pay only for the compute and resources your workloads actually use. |
| Security | Built-in AWS IAM integration and managed networking for enhanced security. |
| Observability | Seamless monitoring and logging integration with AWS observability tools. |
Example Use Cases
- Running GPU-based AI/ML workloads without managing node groups.
- Hosting microservices with unpredictable scaling patterns.
- Deploying short-lived workloads in a fully managed environment.
You can easily create EKS Cluster:
e.g.
eksctl create cluster --name=<cluster-name> --enable-auto-mode
or
cluster.yaml
# cluster.yaml
apiVersion: eksctl.io/v1alpha5
kind: ClusterConfig

metadata:
  name: <cluster-name>
  region: <aws-region>

iam:
  # ARN of the Cluster IAM Role
  # optional, eksctl creates a new role if not supplied
  # suggested to use one Cluster IAM Role per account
  serviceRoleARN: <arn-cluster-iam-role>

autoModeConfig:
  # defaults to false
  enabled: boolean
  # optional, defaults to [general-purpose, system].
  # suggested to leave unspecified
  # To disable creation of nodePools, set it to the empty array ([]).
  nodePools: []string
  # optional, eksctl creates a new role if this is not supplied
  # and nodePools are present.
  nodeRoleARN: string
eksctl create cluster -f cluster.yamlHow EKS Auto Mode Provisions Compute, Storage, and Networking Automatically

1. Automatic Compute Provisioning
EKS Auto Mode dynamically manages compute resources to match the scheduling needs of your pods.
- No Node Groups: You don’t need to define or manage EC2 instances, node groups, or scaling policies.
- On-Demand Scaling: When you deploy pods, EKS automatically provisions compute capacity (EC2) based on CPU, memory, and GPU requirements.
- Optimized Placement: The scheduler intelligently places pods across AWS infrastructure for performance and cost efficiency.
- Instance Abstraction: Developers interact only with Kubernetes objects — not underlying EC2 instances.
Example:
kubectl apply -f nginx-deployment.yaml
➡️ EKS Auto Mode automatically provisions compute to run the deployment without any manual node setup.
2. Automatic Storage Management
EKS Auto Mode handles persistent storage provisioning seamlessly through AWS-managed storage classes.
- Dynamic Volume Provisioning: Creates and attaches EBS or EFS volumes automatically when a PersistentVolumeClaim (PVC) is requested.
- Optimized Performance: Selects appropriate storage types (e.g., gp3, io2) based on workload characteristics.
- Seamless Cleanup: Automatically detaches and deletes unused volumes when workloads are terminated.
Note: EKS Auto Mode does not create a StorageClass for you. You must create a StorageClass referencing ebs.csi.eks.amazonaws.com to use the storage capability of EKS Auto Mode.
Example:
First, create a file named storage-class.yaml:
apiVersion: storage.k8s.io/v1
kind: StorageClass
metadata:
  name: auto-ebs-sc
  annotations:
    storageclass.kubernetes.io/is-default-class: "true"
allowedTopologies:
- matchLabelExpressions:
  - key: eks.amazonaws.com/compute-type
    values:
    - auto
provisioner: ebs.csi.eks.amazonaws.com
volumeBindingMode: WaitForFirstConsumer
parameters:
  type: gp3
  encrypted: "true"
then:
pvc.yaml
apiVersion: v1
kind: PersistentVolumeClaim
metadata:
  name: data-storage
spec:
  accessModes:
    - ReadWriteOnce
  resources:
    requests:
      storage: 10Gi
➡️ EKS Auto Mode provisions an EBS volume automatically and attaches it to the running pod.
3. Automatic Networking Configuration
Networking in EKS Auto Mode is automatically configured and optimized for Kubernetes workloads.
- VPC Integration: Automatically associates pods with subnets and security groups.
- Pod-Level IP Management: Uses the AWS VPC CNI plugin to assign IPs to pods directly from the VPC.
- Load Balancing: Built-in managed load balancer controllers that automatically create ALB/NLB based on Ingress resources
- Secure Connectivity: Applies IAM policies and security group rules automatically.
EKS Auto Mode GPU Support for ML/AI and Deep Learning Workloads
Amazon EKS Auto Mode simplifies running GPU-based workloads for machine learning (ML), artificial intelligence (AI), and deep learning (DL) by automatically provisioning and managing GPU-enabled compute resources. It removes the need to manually configure node groups, GPU drivers, or scaling mechanisms — allowing data scientists and ML engineers to focus on training and inference.
1. GPU-Optimized Compute Provisioning
EKS Auto Mode automatically selects and provisions GPU-enabled EC2 instances (such as p4d, g5, g6, or trn1 families) based on the pod's resource requirements.
Key Features:
- Automatic GPU Node Provisioning: No need to manually define or maintain GPU node groups.
- Pod-Level GPU Requests: Specify GPU requirements directly in the pod spec using resource limits.
- Optimized Scheduling: EKS schedules GPU workloads efficiently across the cluster.
- Driver Management: GPU drivers and runtime libraries are preconfigured and managed automatically.
Example — Requesting a GPU in a Pod:
Deploy a GPU NodePool tailored to run ML models. Apply the following NodePool manifest:
cat << EOF | kubectl apply -f -
apiVersion: karpenter.sh/v1
kind: NodePool
metadata:
  name: gpu-node-pool
spec:
  template:
    metadata:
      labels:
        type: karpenter
        NodeGroupType: gpu-node-pool
    spec:
      nodeClassRef:
        group: eks.amazonaws.com
        kind: NodeClass
        name: default
      taints:
        - key: nvidia.com/gpu
          value: Exists
Source: AWS
Check:
kubectl get nodepools
Expected output:
NAME              NODECLASS   NODES   READY   AGE
general-purpose   default     0       True    15m
gpu-node-pool     default     0       True    8s
system            default     2       True    15m
Now , Deploy the gpt-oss-20b model using vLLM
vLLM is a high-throughput, open source inference engine optimized for large language models (LLMs). The following YAML deploys the vllm/vllm-openai:gptoss container image, which is model-agnostic. In this example, we specify openai/gpt-oss-20b as the model for vLLM to serve.
cat << EOF | kubectl apply -f -
apiVersion: apps/v1
kind: Deployment
metadata:
  name: gpt-oss-20b
spec:
  replicas: 1
  selector:
    matchLabels:
      app: vllm-gptoss-20b
  template:
    metadata:
      labels:
        app: vllm-gptoss-20b
    spec:
      tolerations:
        - key: nvidia.com/gpu
          operator: Exists
          effect: NoSchedule
Source: AWS
This deployment uses a toleration for nvidia.com/gpu, matching the taint on your GPU NodePool. Initially, no GPU nodes are present, so the pod enters the Pending state. Karpenter detects the unschedulable pod and automatically provision a GPU node. When the instance is ready, the pod is scheduled and transitions to the ContainerCreating state, at which point it begins pulling the vllm container image. When the container image is pulled and unpacked, the container enters the Running state.
Verify:
kubectl port-forward service/gptoss-service 8000:8000
In another terminal, send a test prompt using curl:
curl http://localhost:8000/v1/chat/completions \
  -H "Content-Type: application/json" \
  -d '{
    "model": "openai/gpt-oss-20b",
    "messages": [
      {
        "role": "user",
        "content": "What is machine learning?"
      }
    ],
    "temperature": 0.7,
    "max_tokens": 100
  }' | jq -r '.choices[0].message.content'
Sample output:
**Machine learning (ML)** is a branch of computer science that gives computers the ability to learn from data, identify patterns, and make decisions or predictions without being explicitly programmed to perform each specific task.
2. Use Cases for GPU Workloads
EKS Auto Mode is ideal for GPU-intensive applications such as:
- Model Training: Deep learning frameworks like TensorFlow, PyTorch, and MXNet.
- Inference Serving: Real-time predictions using models deployed on GPU nodes.
- Computer Vision: Image classification, object detection, and video analytics.
- Generative AI: LLM fine-tuning and inference workloads.
- Data Processing: GPU-accelerated ETL and scientific computation.
3. Integration with AWS ML Ecosystem
EKS Auto Mode seamlessly integrates with other AWS ML services to form an end-to-end pipeline:
- Amazon SageMaker: For managed model training and deployment.
- Amazon ECR: For hosting GPU-optimized container images.
- Amazon S3: For dataset and model artifact storage.
- AWS Batch & Step Functions: For workflow orchestration and job automation.
4. Cost Optimization and Scaling
EKS Auto Mode intelligently allocates GPU resources to optimize utilization and costs.
- On-Demand GPU Provisioning: GPU nodes are created only when required and terminated after use.
- Right-Sizing: Automatically matches pod requirements to the most suitable GPU instance family.
- Spot GPU Support: Optionally uses Spot Instances to reduce training costs.
5. Monitoring and Observability
- CloudWatch Metrics: Monitor GPU utilization, memory, and job performance.
- Prometheus & Grafana: Integrate to visualize GPU resource usage at the container level.
- AWS X-Ray: Trace GPU-based workloads for performance analysis.
Tip: Combine EKS Auto Mode with AWS Inferentia or Trainium instances for cost-effective large-scale deep learning.
How EKS Auto Mode Integrates with Karpenter
Amazon EKS Auto Mode integrates with Karpenter, the open-source Kubernetes cluster autoscaler, to deliver intelligent, fast, and efficient provisioning of compute resources. Under the hood, Karpenter acts as the dynamic provisioning engine that powers EKS Auto Mode’s ability to launch and scale compute capacity in response to workload demands — without requiring manual configuration of node groups or scaling policies.
The Role of Karpenter in EKS Auto Mode
Karpenter replaces traditional node group and cluster autoscaler approaches by making real-time decisions about provisioning the optimal instance types, sizes, and placement for workloads.
Key Contributions of Karpenter:
- Intelligent Scheduling: Listens to unschedulable pods and rapidly provisions compute that meets their resource requirements.
- Flexible Provisioning: Selects from a wide range of EC2 instance types (including GPU, Spot, and ARM instances) for cost and performance optimization.
- Ephemeral Node Management: Creates and terminates nodes on demand based on pod lifecycle, reducing idle capacity.
- Improved Efficiency: Eliminates static node group definitions and underutilized capacity.
How EKS Auto Mode Uses Karpenter
In EKS Auto Mode, AWS fully manages Karpenter’s configuration and control plane integration. Users don’t need to install, maintain, or tune Karpenter — it’s seamlessly built into the EKS service.
Under-the-Hood Workflow:
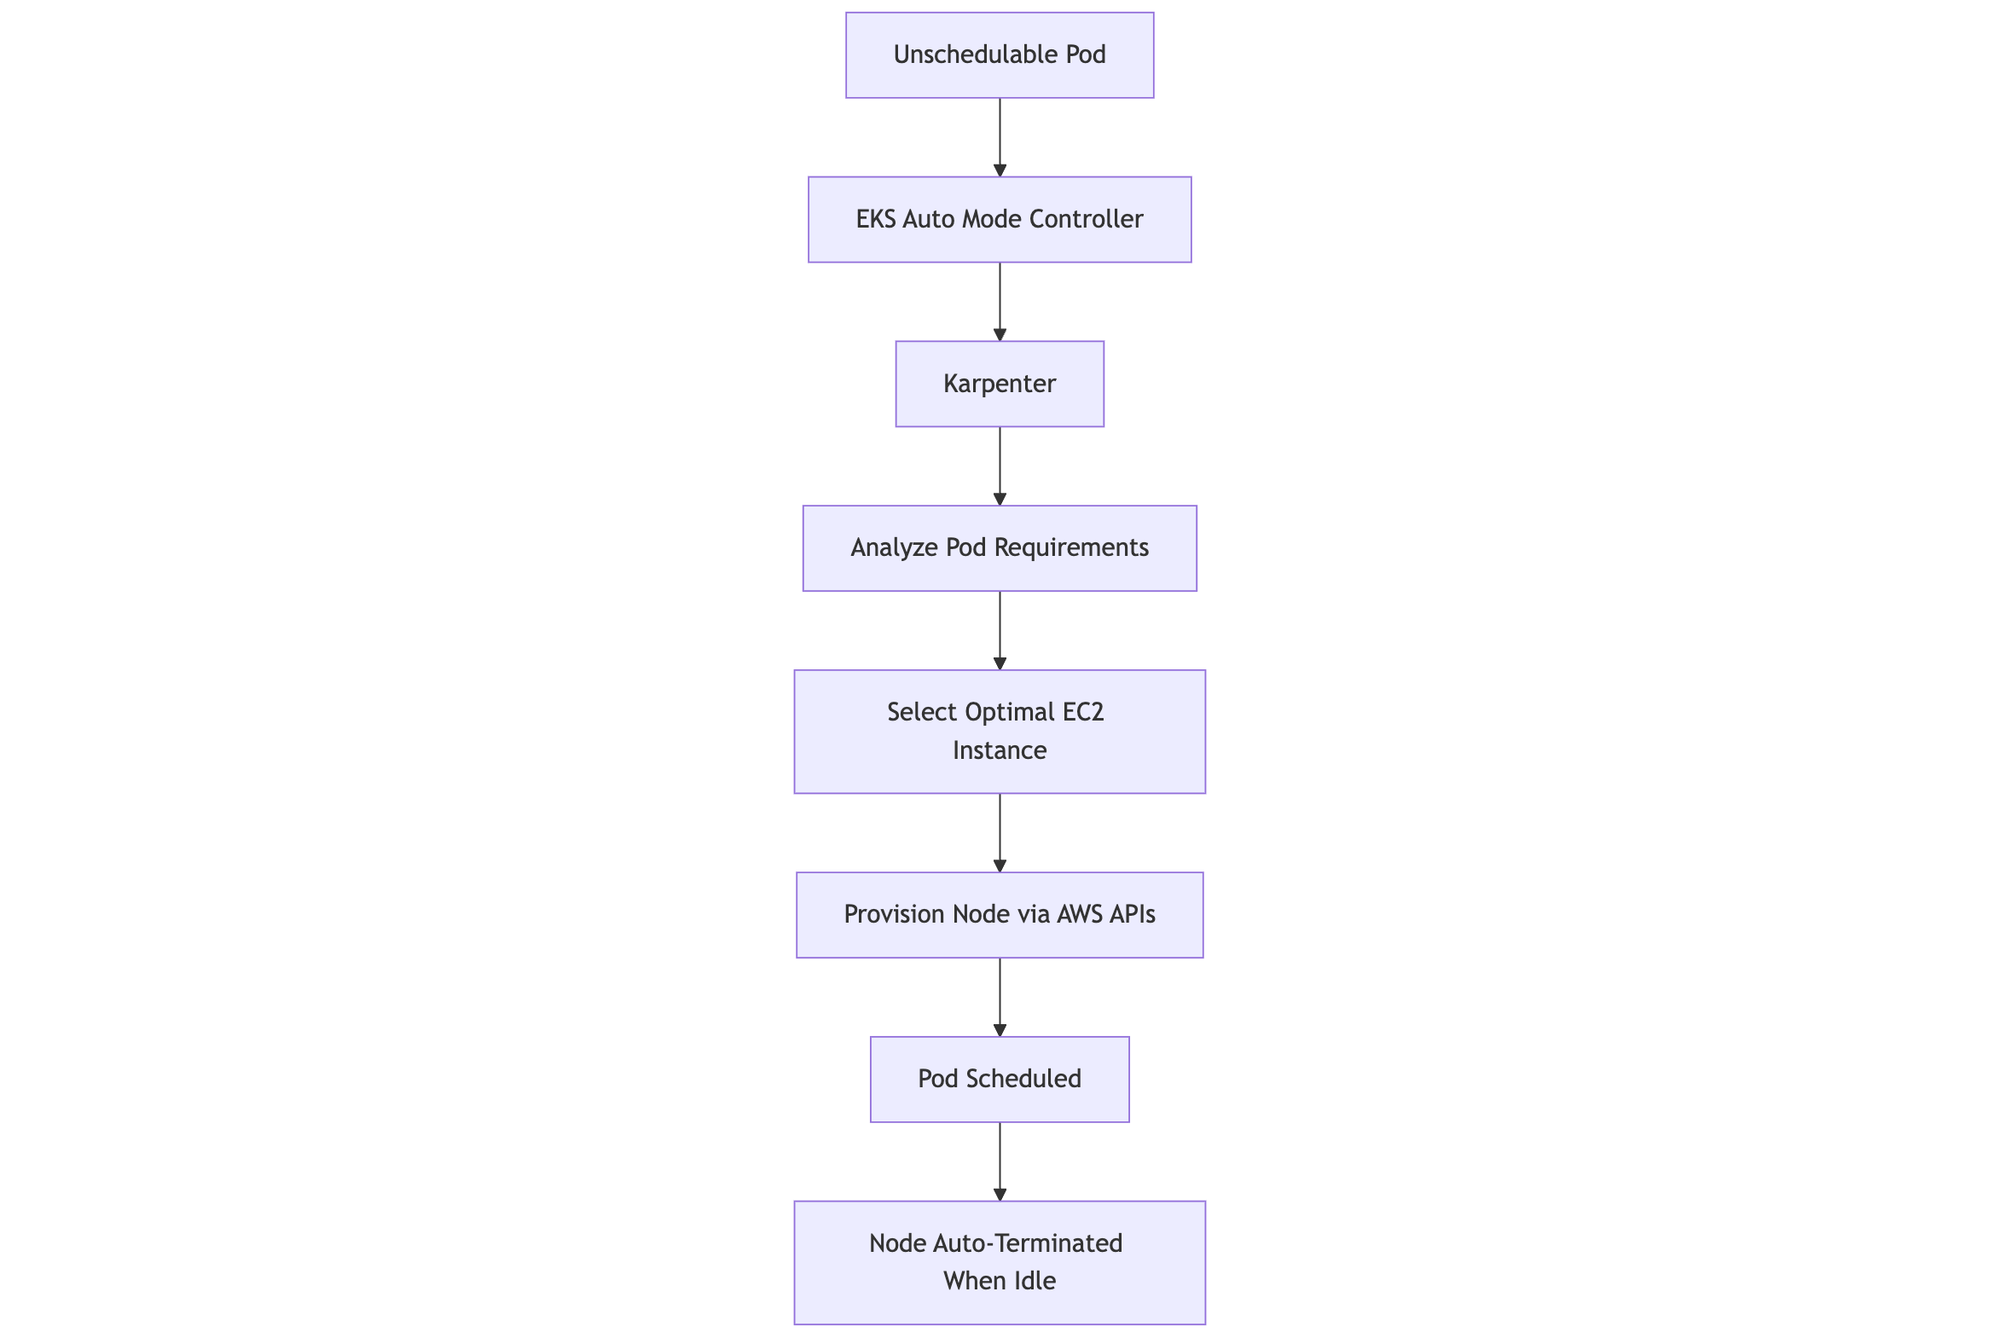
- Pod Scheduling: When a new pod cannot be scheduled due to lack of capacity, EKS Auto Mode notifies Karpenter.
- Capacity Analysis: Karpenter analyzes pod requirements (CPU, memory, GPU, and topology constraints).
- Instance Selection: It determines the best-fit EC2 instance type, size, and placement based on real-time pricing and availability.
- Instance Provisioning: Karpenter launches the instance directly via the EKS-managed AWS APIs.
- Pod Binding: The new node joins the cluster, and the pod is scheduled instantly.
- Node Termination: Once workloads complete, idle nodes are automatically drained and terminated.
Challenges
- Launch an EKS Auto Mode cluster and deploy a GPU-enabled TensorFlow or PyTorch container.
- Monitor GPU usage using CloudWatch or Prometheus metrics.
- Deploy an ML inference service (e.g., image classification API) using a GPU-backed pod.
- Use Horizontal Pod Autoscaler (HPA) to scale GPU pods based on load.
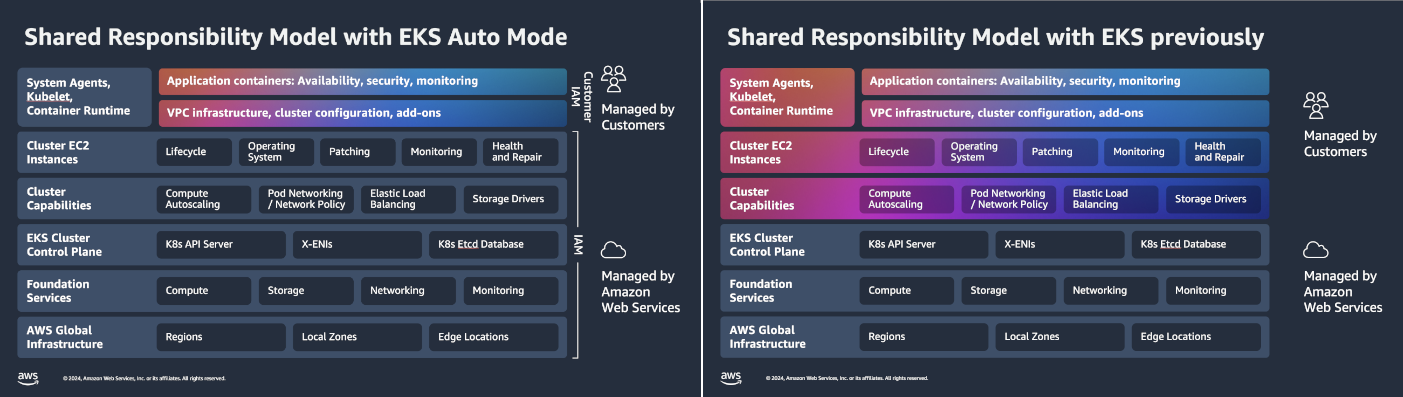
- Compare EKS Auto Mode cost and management effort vs traditional EKS Managed Node Groups.
- Implement IAM Roles for Service Accounts (IRSA) for secure S3 model access inside GPU pods.
- Use Application Load Balancer for ingress traffic
🤷🏻 How to Participate?
✅ Complete the tasks and challenges.
✅ Document your progress and key takeaways on GitHub ReadMe, Medium, or Hashnode.
✅ Share the above in a LinkedIn post tagging me (Sandip Das), and use #90DaysOfCloud to engage with the community!


Member discussion