

What is OpenOps?
OpenOps is an open-source No-Code FinOps & CloudOps automation platform that empowers organizations to reduce cloud costs and streamline financial operations.
Key Capabilities
- Customizable No-Code Workflows
Automate cloud cost management activities like:- Resource optimization
- Budgeting & forecasting
- Cost allocation & tagging
- Integrated Spreadsheet-like Database: OpenOps Tables
Track and manage cost opportunities and workflow statuses. - Built-in Analytics Module
Visualize reports and monitor FinOps KPIs.
Action-Oriented Automation
Unlike traditional reporting tools, OpenOps enables teams to:
- Detect cost anomalies (e.g. underutilized servers)
- Act on them (e.g. resize instance, generate Jira ticket)
- Notify stakeholders via Slack, Teams, etc.
It promotes collaboration among:
- FinOps teams
- DevOps & Engineering
- Finance & Leadership
Integration Ecosystem
OpenOps supports integrations with:
- Major Cloud Providers: AWS, Azure, GCP
- Collaboration Tools: Slack, Microsoft Teams, Jira, and more
- Human-in-the-loop governance via approvals (Slack/email)
Key Features
- Pre-built FinOps workflow library (based on industry best practices)
- Drag-and-drop visual workflow editor
- Deep integration with cloud APIs & third-party tools
- Self-hosted or managed service deployment
OpenOps Installation Instructions
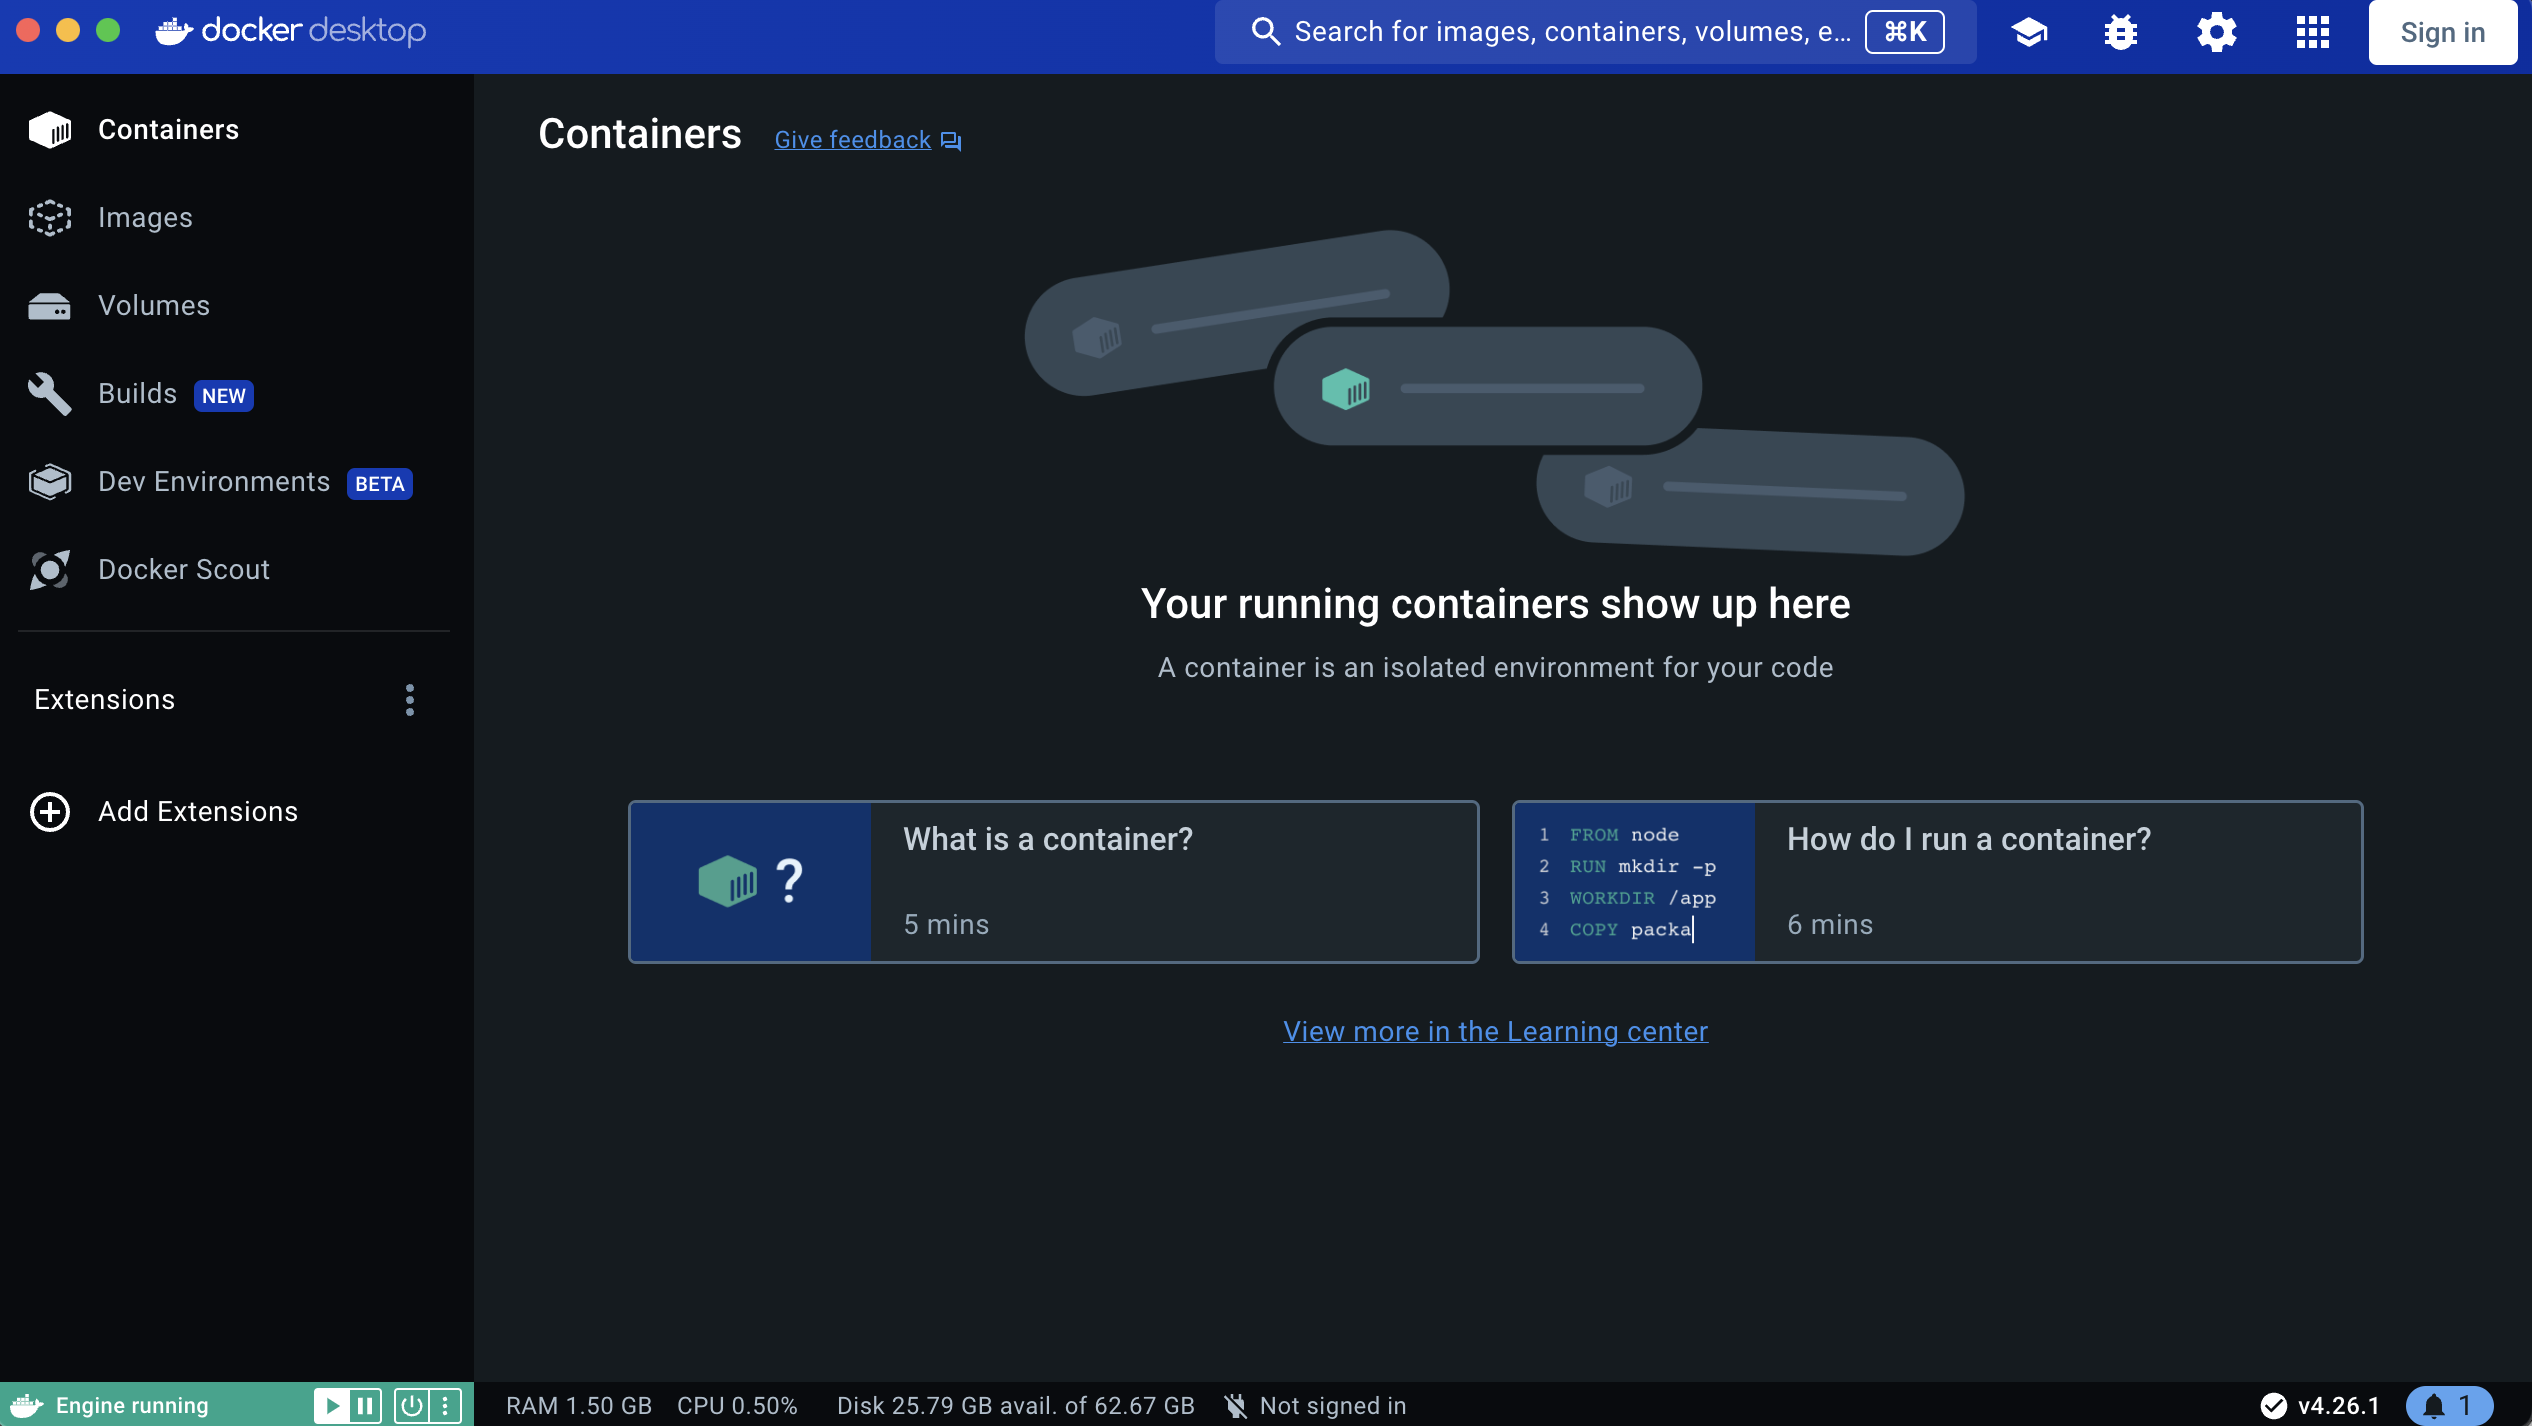
OpenOps is distributed as a Docker-based installation, compatible with macOS, Windows, and Linux (Ubuntu). Ensure your system meets the following:
OS Requirements
- macOS: Big Sur (11.x) or later
- Windows: 10 or 11
- Linux: Ubuntu 20.04 or later
Software Requirements
- Docker: Docker Desktop (macOS/Windows) or Docker Engine (Linux) must be installed and running
- Docker Compose: Included with Docker Desktop or must be installed separately on Linux
Hardware Requirements
Based on your use case:
- 🔍 Exploring OpenOps & building automations:
- CPU: 2 cores
- RAM: 8GB
- Storage: 50GB
- 🚀 Production use & running automations:
- CPU: 4 cores
- RAM: 16GB
- Storage: 100GB
Installing on macOS (Docker Desktop)
1. Install Docker Desktop
- Download and install from Docker Official Site
2. Download OpenOps
mkdir -p openops && cd openops
curl -OL https://github.com/openops-cloud/openops/releases/download/<VERSION>/openops-dc-<VERSION>.zip
unzip openops-dc-<VERSION>.zip
cp -n .env.defaults .env
Replace <VERSION> with the latest release (e.g., 0.2.10)
e.g.
mkdir -p openops && cd openops
curl -OL https://github.com/openops-cloud/openops/releases/download/0.2.10/openops-dc-0.2.10.zip
unzip openops-dc-0.2.10.zip
cp -n .env.defaults .env
3. Configure Admin Credentials
- Open
.envin a text editor (e.g., VS Code) - Update
OPS_OPENOPS_ADMIN_EMAILandOPS_OPENOPS_ADMIN_PASSWORD
4. Launch OpenOps
COMPOSE_PARALLEL_LIMIT=4 docker compose pull
docker compose up -d
If you face errors like pull access denied, try:
docker logout public.ecr.aws
5. Access the App
- Go to
http://localhostin your browser - Log in using the admin credentials
Installing on Windows (Docker Desktop)
1. Install Docker Desktop
- Download from Docker Official Site
2. Download OpenOps (PowerShell as Administrator)
New-Item -ItemType Directory -Force -Path C:\openops
Set-Location C:\openops
Invoke-WebRequest -Uri "https://github.com/openops-cloud/openops/releases/download/<VERSION>/openops-dc-<VERSION>.zip" -OutFile "openops-dc.zip"
Expand-Archive -Path "openops-dc.zip" -DestinationPath .
if (-Not (Test-Path ".env")) { Copy-Item ".env.defaults" ".env" }
Replace <VERSION> with the latest release (e.g., 0.2.10)
e.g.
New-Item -ItemType Directory -Force -Path C:\openops
Set-Location C:\openops
Invoke-WebRequest -Uri "https://github.com/openops-cloud/openops/releases/download/0.2.10/openops-dc-0.2.10.zip" -OutFile "openops-dc.zip"
Expand-Archive -Path "openops-dc.zip" -DestinationPath .
if (-Not (Test-Path ".env")) { Copy-Item ".env.defaults" ".env" }
3. Configure Admin Credentials
- Open
.envfile and update email/password as above
4. Launch OpenOps
$env:COMPOSE_PARALLEL_LIMIT = "4"
docker compose pull
docker compose up -d
5. Access the App
- Open browser to
http://localhost - Use admin credentials to log in
🔐 Note: Run PowerShell as Administrator and ensure Docker Desktop is running
🐧 Installing on Linux (Ubuntu with Docker Engine)
1. Install Docker & Compose
# Update system
sudo apt update && sudo apt upgrade -y

# Install dependencies
sudo apt install -y apt-transport-https ca-certificates curl software-properties-common unzip

# Add Docker's official GPG key
sudo mkdir -p /etc/apt/keyrings
curl -fsSL https://download.docker.com/linux/ubuntu/gpg | sudo tee /etc/apt/keyrings/docker.asc > /dev/null

# Set up Docker repository
echo \
"deb [arch=$(dpkg --print-architecture) signed-by=/etc/apt/keyrings/docker.asc] https://download.docker.com/linux/ubuntu \
$(lsb_release -cs) stable" | sudo tee /etc/apt/sources.list.d/docker.list > /dev/null

# Install Docker Engine
sudo apt update
sudo apt install -y docker-ce docker-ce-cli containerd.io docker-buildx-plugin docker-compose-plugin

# Start and enable Docker
sudo systemctl enable docker
sudo systemctl start docker
sudo systemctl status docker
Verify Docker Installation
docker --version
# Docker version 28.0.1, build 068a01e

docker compose version
# Docker Compose version v2.33.1
Add user to Docker group:
sudo usermod -aG docker $USER
newgrp docker
2. Download OpenOps
mkdir -p ~/openops && cd ~/openops
curl -OL https://github.com/openops-cloud/openops/releases/download/<VERSION>/openops-dc-<VERSION>.zip
unzip openops-dc-<VERSION>.zip
cp -n .env.defaults .env
Replace <VERSION> with the latest release (e.g., 0.2.10)
e.g.
mkdir -p ~/openops && cd ~/openops
curl -OL https://github.com/openops-cloud/openops/releases/download/0.2.10/openops-dc-0.2.10.zip
unzip openops-dc-0.2.10.zip
cp -n .env.defaults .env
3. Set Public URL (if remote)
- Edit
.envand setOPS_PUBLIC_URL=http://<server-ip>
4. Configure Admin Credentials
- Same as macOS steps above
5. Launch OpenOps
sudo COMPOSE_PARALLEL_LIMIT=4 docker compose pull
sudo docker compose up -d
6. Access the App
- Local GUI:
http://localhost - Remote access:
http://<server-ip>
💡 Tip: Enable startup via systemd or init script for production use
Once installation completes, OpenOps will be available via browser UI. Log in using the credentials from .env. Refer to the "Getting Started" section for app usage.
Getting Started with OpenOps
Logging In and Initial Setup
- Access OpenOps UI: Open the app in a browser (
http://localhostor your server domain). - Sign In: Use admin credentials defined in your
.envfile.- Default:
[email protected]/please-change-this-password-1
- Default:
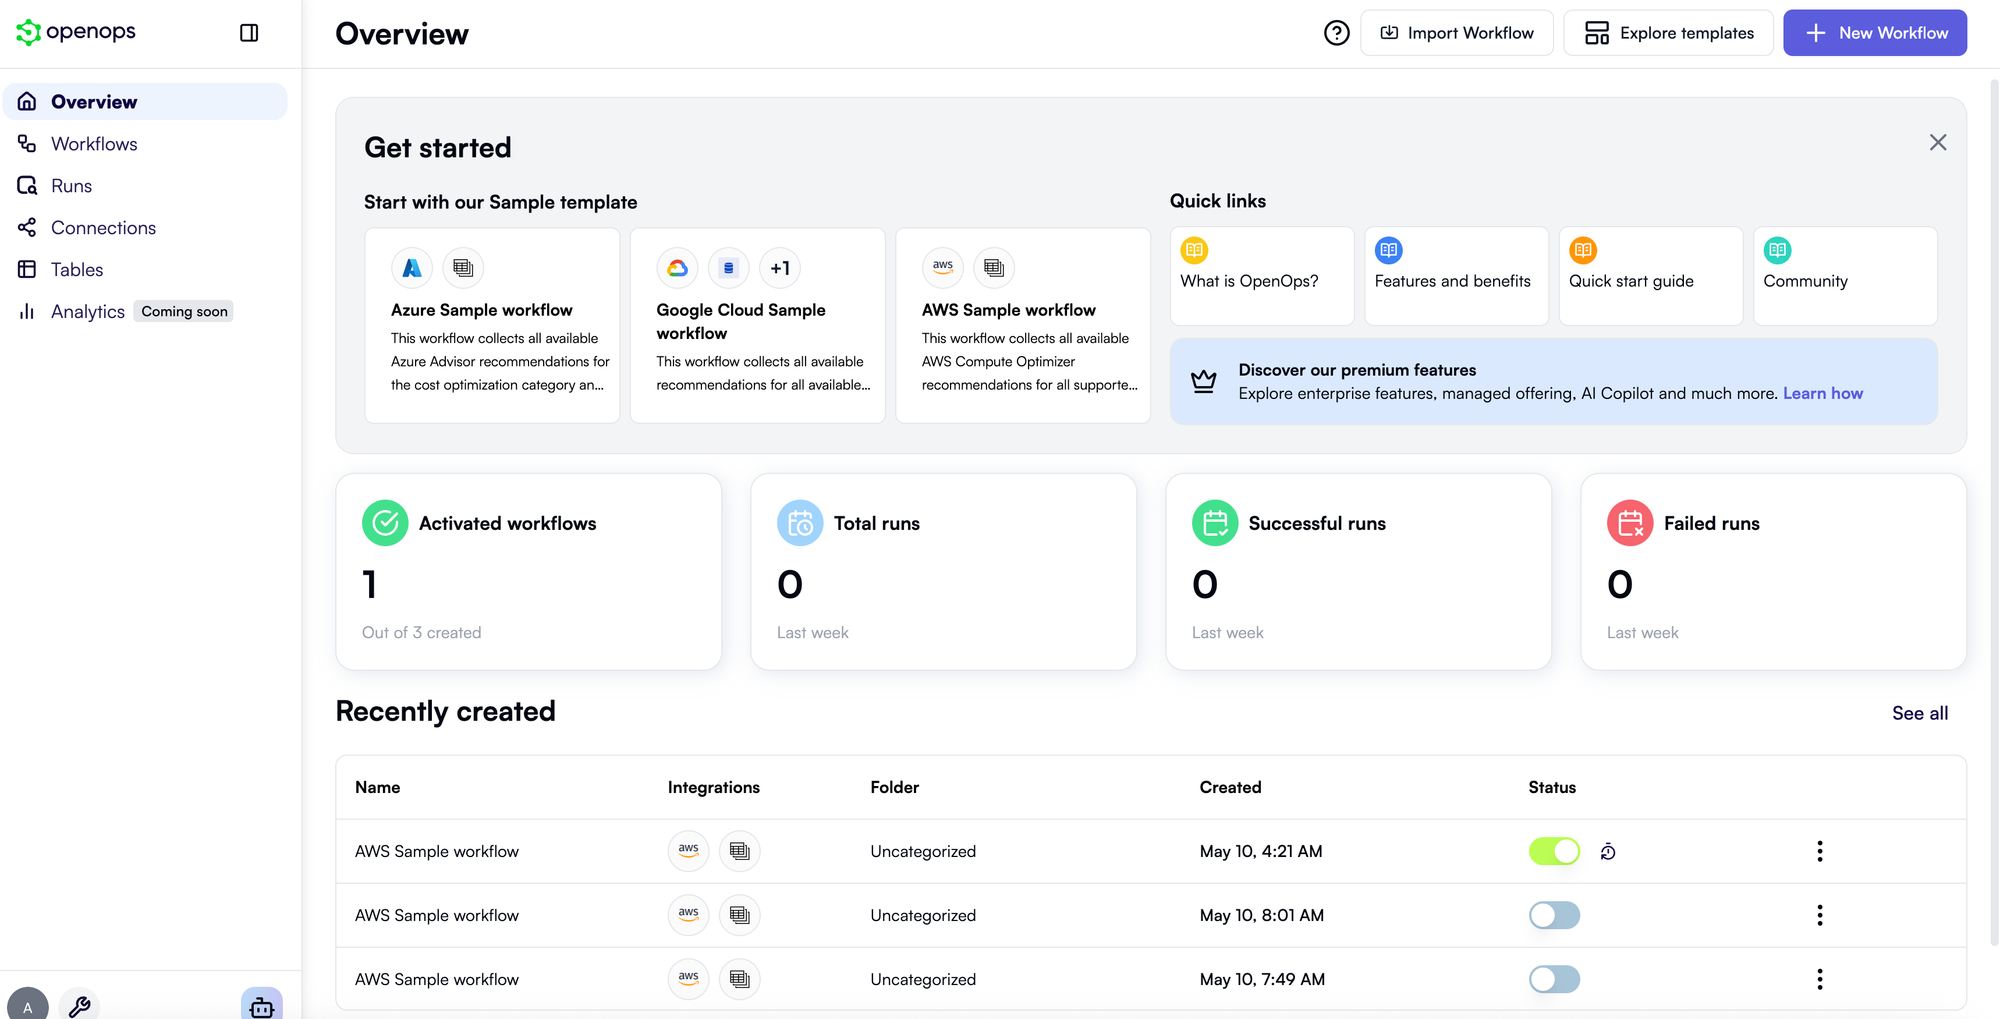
- Familiarize with UI:
- Overview: Dashboard with activity and sample workflows
- Workflows: Build/manage automation workflows
- Runs: Monitor execution history (success/failure)
- Connections: Add/manage cloud accounts & integrations
- Tables: Spreadsheet-like interface for storing & viewing data
⚠️ Workflows, Runs, and Tables will be mostly empty on a new install.
☁️ Connecting Your Cloud Environment
All cloud access is managed via the Connections tab.
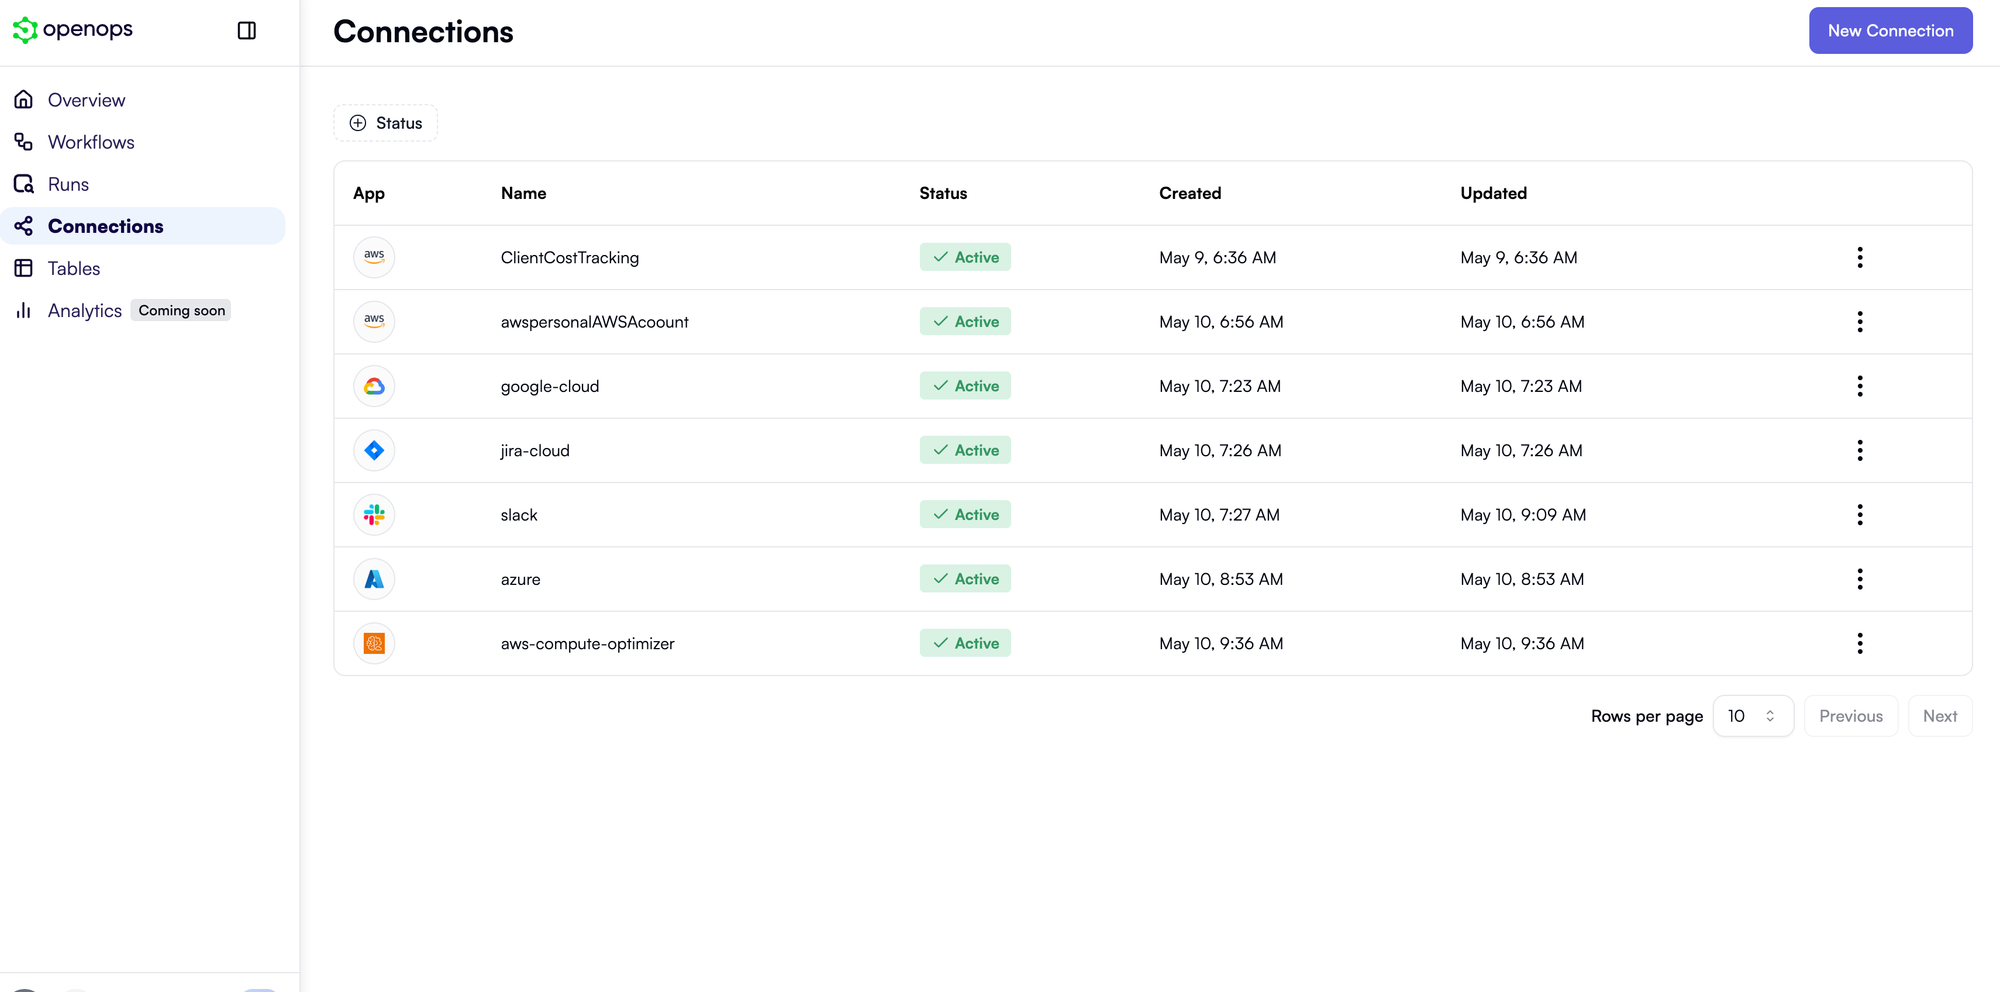
➕ Add a New Connection
- Go to Connections → click New Connection / + Add
- Choose your connection type: AWS, Azure, GCP, Slack, Jira, etc.
- Fill in required credentials:
🔸AWS
- Fields: Access Key ID, Secret Key, Default Region
- Recommended: Use a dedicated IAM user
- Start with
ReadOnlyAccess, scale toec2:StopInstances, etc. if needed
Get the Policy JSON from below 👇

🔸 Azure
- Provide: Application (Client) ID, Client Secret, Tenant ID
- Recommended: Create Service Principal with Reader/Contributor role
- For local session: Set
OPS_ENABLE_HOST_SESSION=trueandHOST_AZURE_CONFIG_DIR=~/.azure
🔸 GCP
- Create a service account and exported a JSON service account key file, paste the contents of the file into the Key file content field, save the connection.
🔸 Other Services (Slack, Jira, etc.)
- Provide required credentials (e.g., webhook URL, API token)
- Save connection. OpenOps securely stores it.
Running Sample Workflows
OpenOps includes sample workflows for AWS, Azure, and GCP to demonstrate FinOps automation.
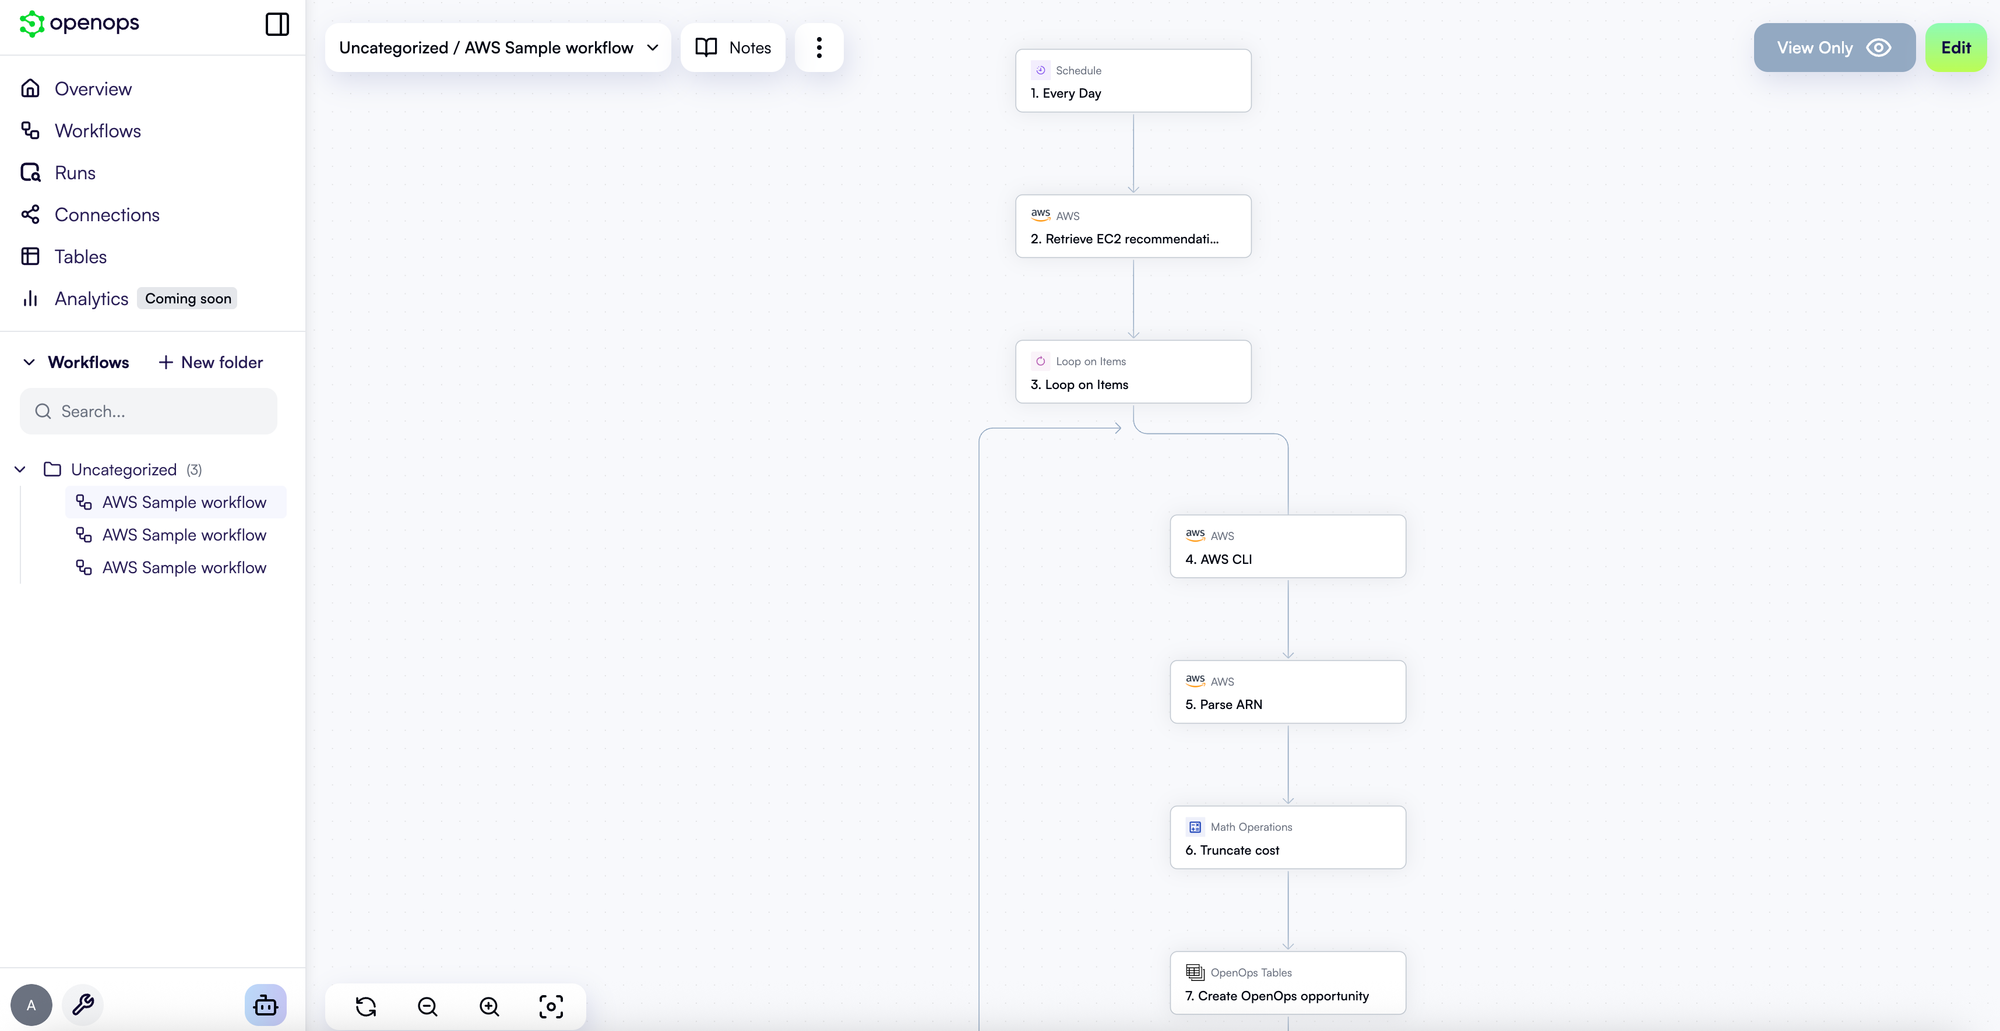
🔷 AWS Sample Workflow
- Navigate: On Overview, click AWS sample workflow → Use Template
- Provide AWS Connection: Add/select a saved connection
- Create Workflow: Workflow opens in editor with visual layout
- Test It:
- Click Trigger step → Load sample data
- Click Test workflow → Verify all steps turn green ✅
- Publish: Activate scheduled execution (e.g., weekdays @ 7 AM UTC)
- View Results: Go to Tables → View Opportunities for EC2, Lambda, EBS optimization tips
🔶 Azure Sample Workflow
- Navigate: Click Azure sample workflow → Use Template
- Provide Azure Connection: Add or select an Azure service principal
- Create Workflow: Opens in editor; fetches Azure Advisor recommendations
- Test and Publish: Follow same steps as AWS
- View Results: Opportunities table will now show Azure-specific tips
📊 Data Table Exploration in OpenOps
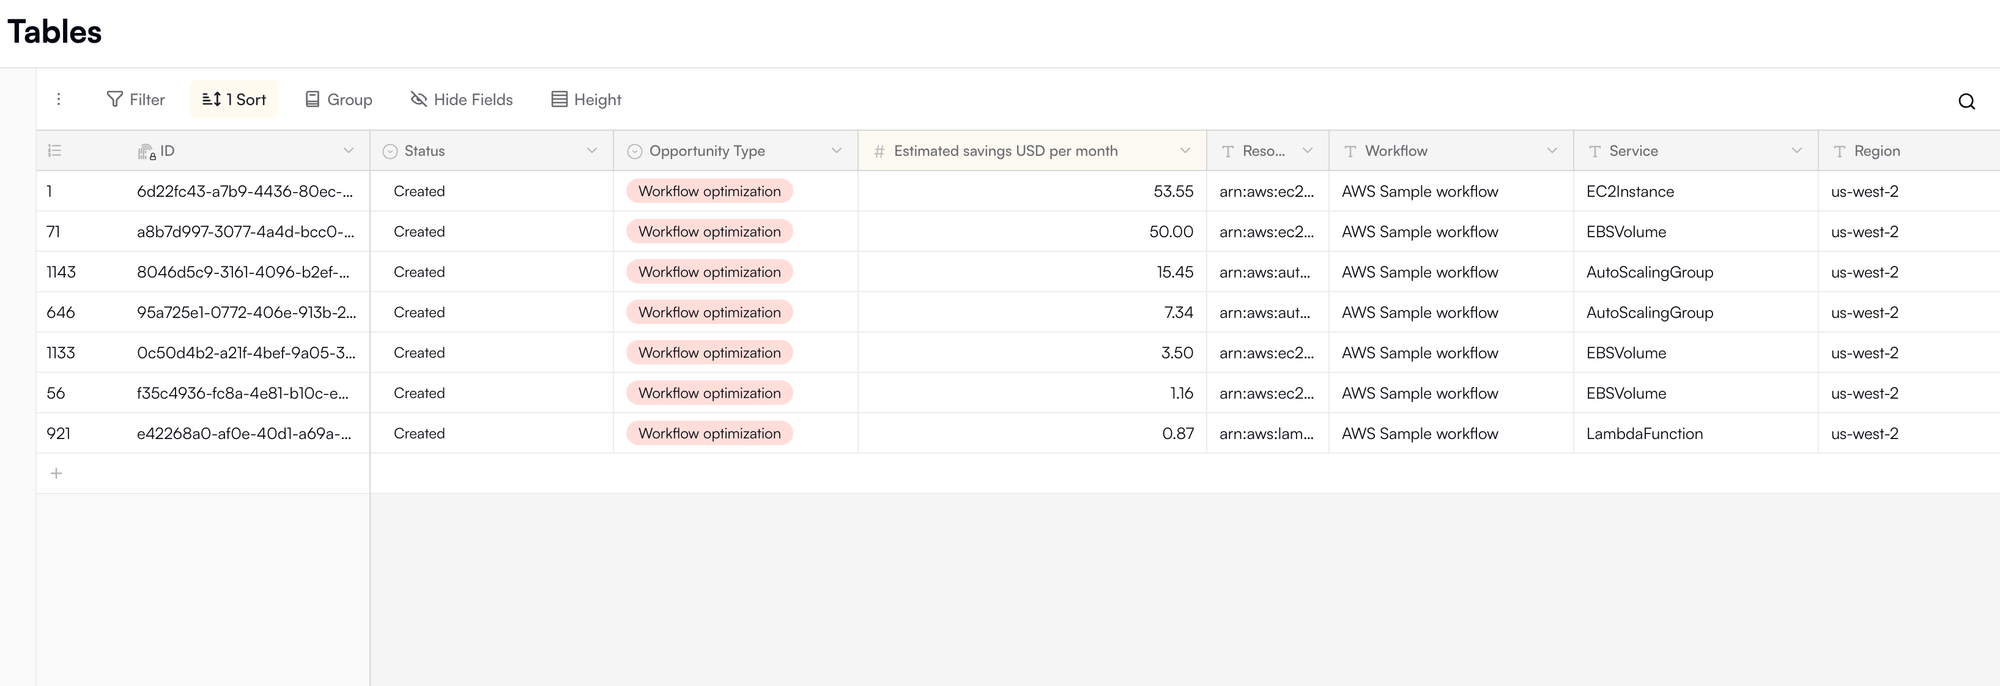
🗂️ Tables
The Tables section in OpenOps is a powerful interface where workflows store collected or generated data. These tables serve as a centralized source of truth for your FinOps metrics, insights, and actions.
📁 Default Dataset: OpenOps Tables
- Opportunities Table: Captures potential cloud savings (e.g., EC2 instance rightsizing, unused resources).
- Assets Table: Inventory of discovered cloud assets across accounts.
- Decisions / Actions Logs: Logs of actions triggered by workflows.
These default tables are part of the OpenOps dataset, available immediately after installation and visible in the Tables section of the UI.
🔍 Using the Table UI
- Tables behave like spreadsheets or database tables.
- You can sort, filter, and inspect rows.
- Click any row for detailed insights (e.g., resource ID, cost estimate, recommendation type).
- You can add entries manually, import CSV data, or let workflows update/populate them.
💡 Post-Workflow Exploration
After running the AWS or Azure sample workflows:
- Visit Tables → Opportunities
- You'll see recommendations like:
- EC2 instance to downsize
- Lambda memory optimization
- Azure VM shutdown advice
- These entries contain cost projections and can trigger alerts or actions in other workflows
🔄 Leveraging Tables for Automation
- Tables aren't just passive data holders—they can drive further workflows.
- Example:
- A workflow reads
Opportunitiesdaily and sends a Slack alert - Another references it to delete idle resources
- A workflow reads
🧠 Key points:
- Tables provide persistent, structured storage for workflow data
- The UI enables exploration, filtering, and editing of entries
- Workflows write to and read from these tables, creating an end-to-end FinOps automation system
Templates Catalog Exploration
Now that the basics are covered, let’s explore the Templates Catalog in OpenOps — a powerful feature for automation.
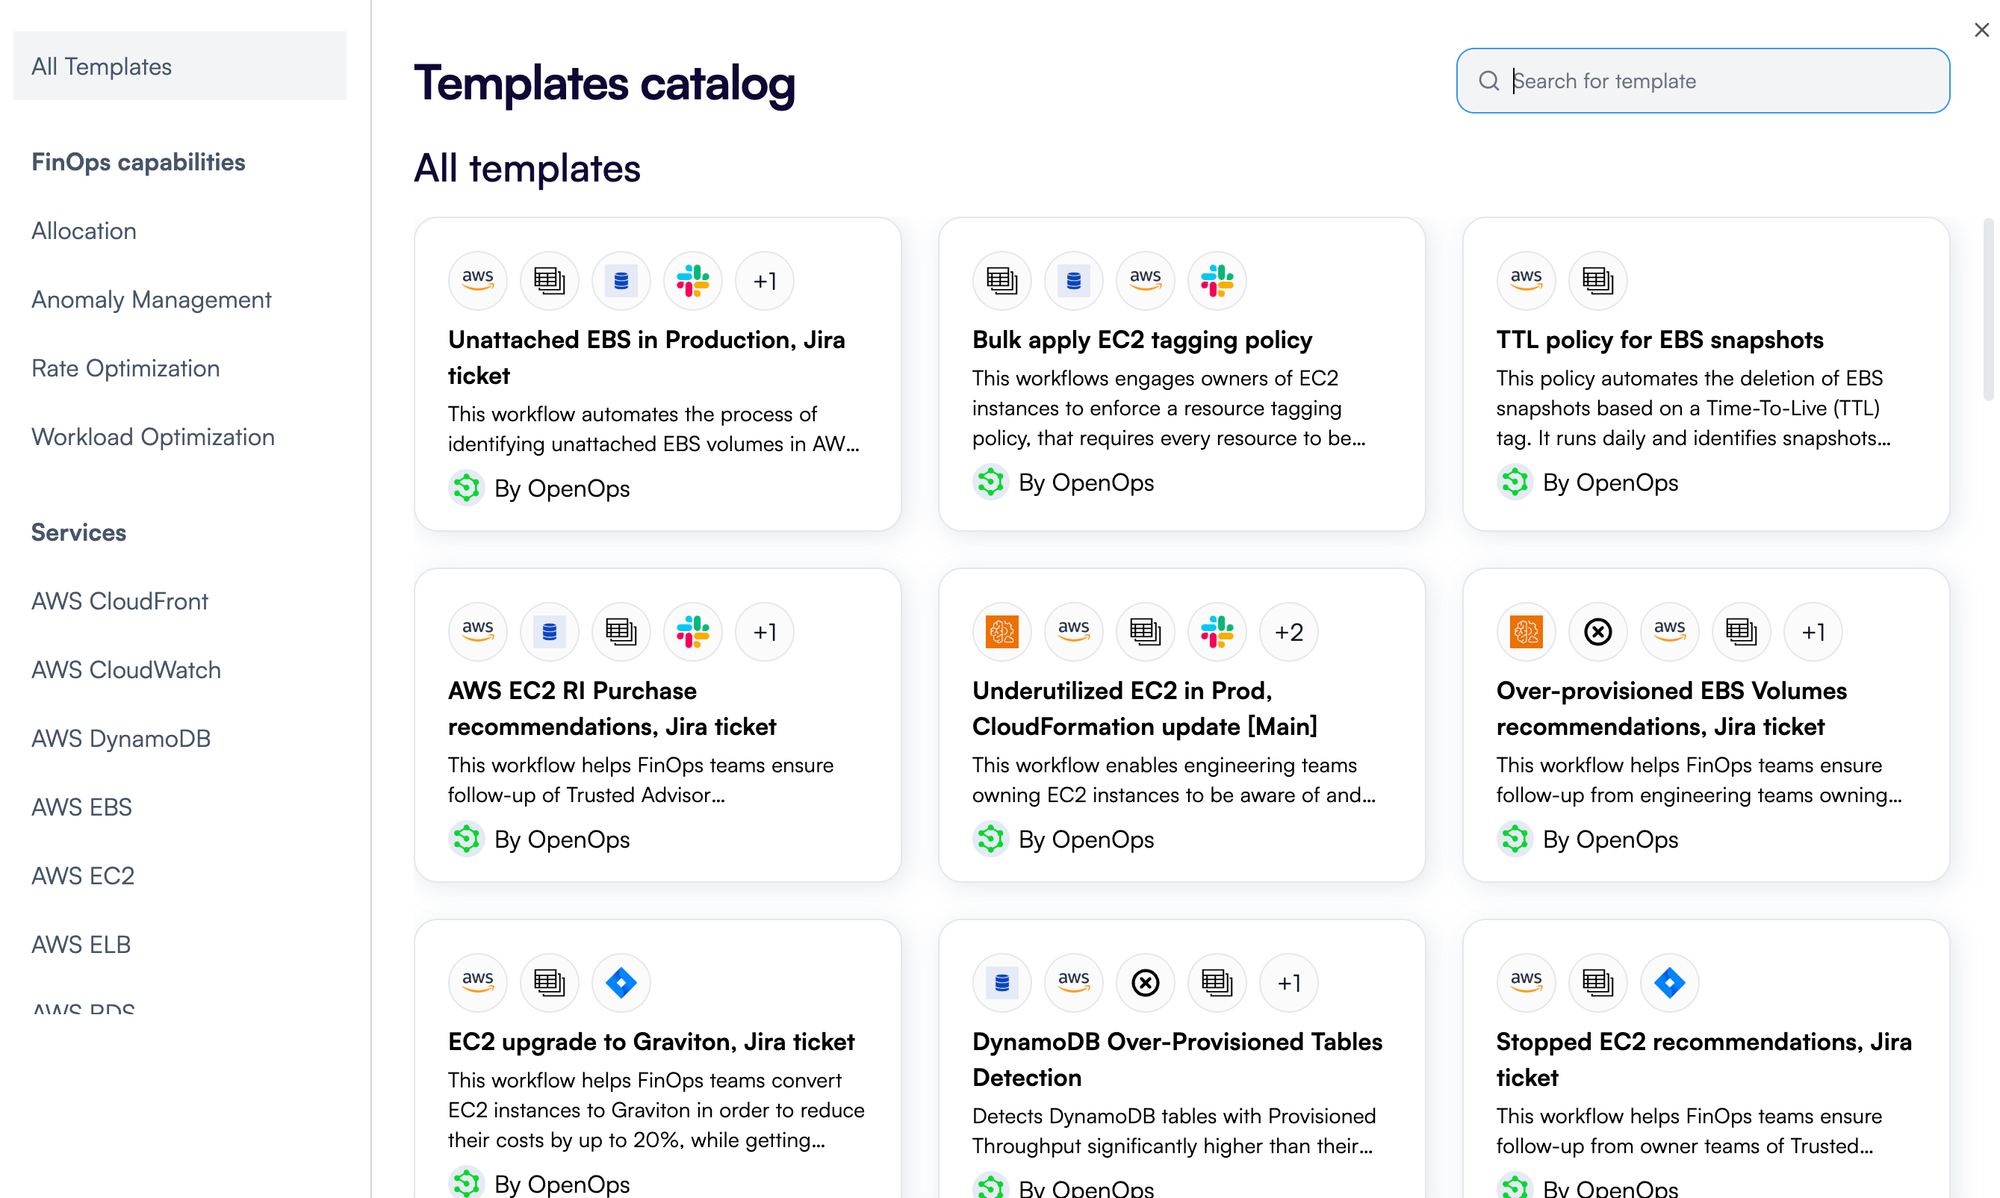
🔍 What is the Templates Catalog?
OpenOps offers a rich Templates Catalog filled with pre-configured workflow templates for various FinOps use cases. These templates can be imported, customized, and executed with minimal changes.
- Access via: "Explore templates" button in the top menu (from Overview or Workflows page)
- Initial view: Around 6 sample templates
- Full catalog: Available after creating a free OpenOps Cloud account → click "Explore more"
Templates cover areas like:
- Anomaly Management
- Workload Optimization
- Rate Optimization
- Allocation & Tagging
💡 Have an idea? You can contribute new templates to the OpenOps community.
Using a Template
Each template includes:
- A name and summary
- Detailed documentation
- Workflow diagram
- Required integrations (e.g., AWS, Jira, Slack)
Steps to use:
- Click on a template → review its description.
- Click "Use template".
- Provide required connections (or skip and add later).
- Workflow appears in draft mode.
- Customize it → publish when ready.
You can modify:
- Steps
- Schedules
- Actions
- Thresholds
Highlighted Templates
1. Workload Optimization – Underutilized EC2 in Test/Staging
- Goal: Rightsize EC2 instances in non-production.
- Logic: Identifies low-utilization EC2s (via CloudWatch or Compute Optimizer), stops them, and resizes to smaller types.
- Tags: Filters instances by tags like
Environment=Staging. - Output: Logs actions, resizes, and cost differences.
- Impact: Saves cost automatically by downsizing over-provisioned resources.
2. Rate Optimization – AWS EC2 RI Purchase Recommendations (Jira Ticket)
- Goal: Surface RI savings recommendations.
- Source: AWS Cost Explorer / Trusted Advisor.
- Action: Creates Jira ticket with savings details.
- Details Included: Instance type, usage, savings, AWS links.
- Customization: Auto-assign tickets, notify via Slack.
- Benefit: Integrates financial savings into team workflows.
3. Allocation – Bulk EC2 Tagging Policy
- Goal: Enforce EC2 tagging compliance.
- Logic: Finds untagged/mistagged instances, applies required tags.
- Example Tags:
Owner,Environment,CostCenter. - Customization: Tag rules, logic, and coverage (e.g., by VPC).
- Optional: Send reports/tickets instead of direct tagging.
- Benefit: Improves visibility and accountability in cost reports.
Customizing Workflows in OpenOps
One of the biggest advantages of OpenOps is the ability to modify and extend workflows to fit your organization’s needs. Templates provide a starting point, but every part of a workflow is customizable: add/remove steps, change triggers, insert approvals, or integrate with other systems.
Scenario: Replace Direct Rightsizing with Jira Ticket
Use case: Instead of automatically rightsizing an EC2 instance in staging when underutilized, create a Jira ticket for manual review.
Steps to Customize the Workflow
1. Open the Workflow Editor
- Go to the Workflows section.
- Click your "Underutilized EC2 in Staging – Rightsize" workflow.
- Click Edit to switch to draft mode if needed.
2. Identify the Rightsizing Step
- Locate the action that performs the rightsizing (e.g., "Modify EC2 Instance" or Lambda function).
- You can delete this step or disable its effect.
3. Insert a Jira Ticket Step
- Click the ➕ at the point where the rightsizing step was.
- From the action selector, choose Jira Cloud → Create Issue.
4. Configure Jira Action
- Ensure a Jira connection is set up (via API token).
- Set properties like:
- Project Key: e.g.,
OPS - Issue Type: Task, Story, etc.
- Summary: e.g.,
Rightsize Recommendation for EC2 i-1234567890 - Description: Pull dynamic fields like instance ID, utilization, and recommendation using the Data Selector
- Labels: e.g.,
FinOps,EC2,Rightsize
- Project Key: e.g.,
5. Adjust Workflow Logic
- Ensure Jira step placement is correct for logging.
- Optionally insert a Human-in-the-Loop approval step (e.g., Slack Ask Approve/Deny).
6. Remove or Disable Old Action
- Delete or disable the original rightsizing step.
- Optionally clone the workflow before deleting as backup.
7. Test the Modified Workflow
- Use Test workflow feature.
- Simulate input with sample/dummy data.
- Review Run Details to verify Jira issue creation.
- Troubleshoot using error messages if needed.
8. Publish the Workflow
- When satisfied, publish the updated workflow.
- The workflow now creates Jira tickets instead of resizing EC2 instances directly.
Additional Customization Options
- Slack Approval + Jira Tracking: Add a Slack approval step before automated actions.
- Flexible Triggers: Modify time-based triggers (daily → weekly).
- Conditional Filters: Add filtering logic based on tags, usage thresholds, etc.
- Custom Code Blocks: Use custom scripts for complex logic (optional).
🧠 Key points:
To customize OpenOps workflows:
- Use the visual editor to modify steps.
- Replace or supplement automation steps with human approval mechanisms.
- Leverage 120+ built-in actions (AWS, Jira, Slack, etc.).
- Test thoroughly before publishing.
This flexibility allows you to tailor workflows to match your organization’s approval flows, policies, and tooling ecosystem—all without writing code (unless desired).
Customizing Workflows with AI
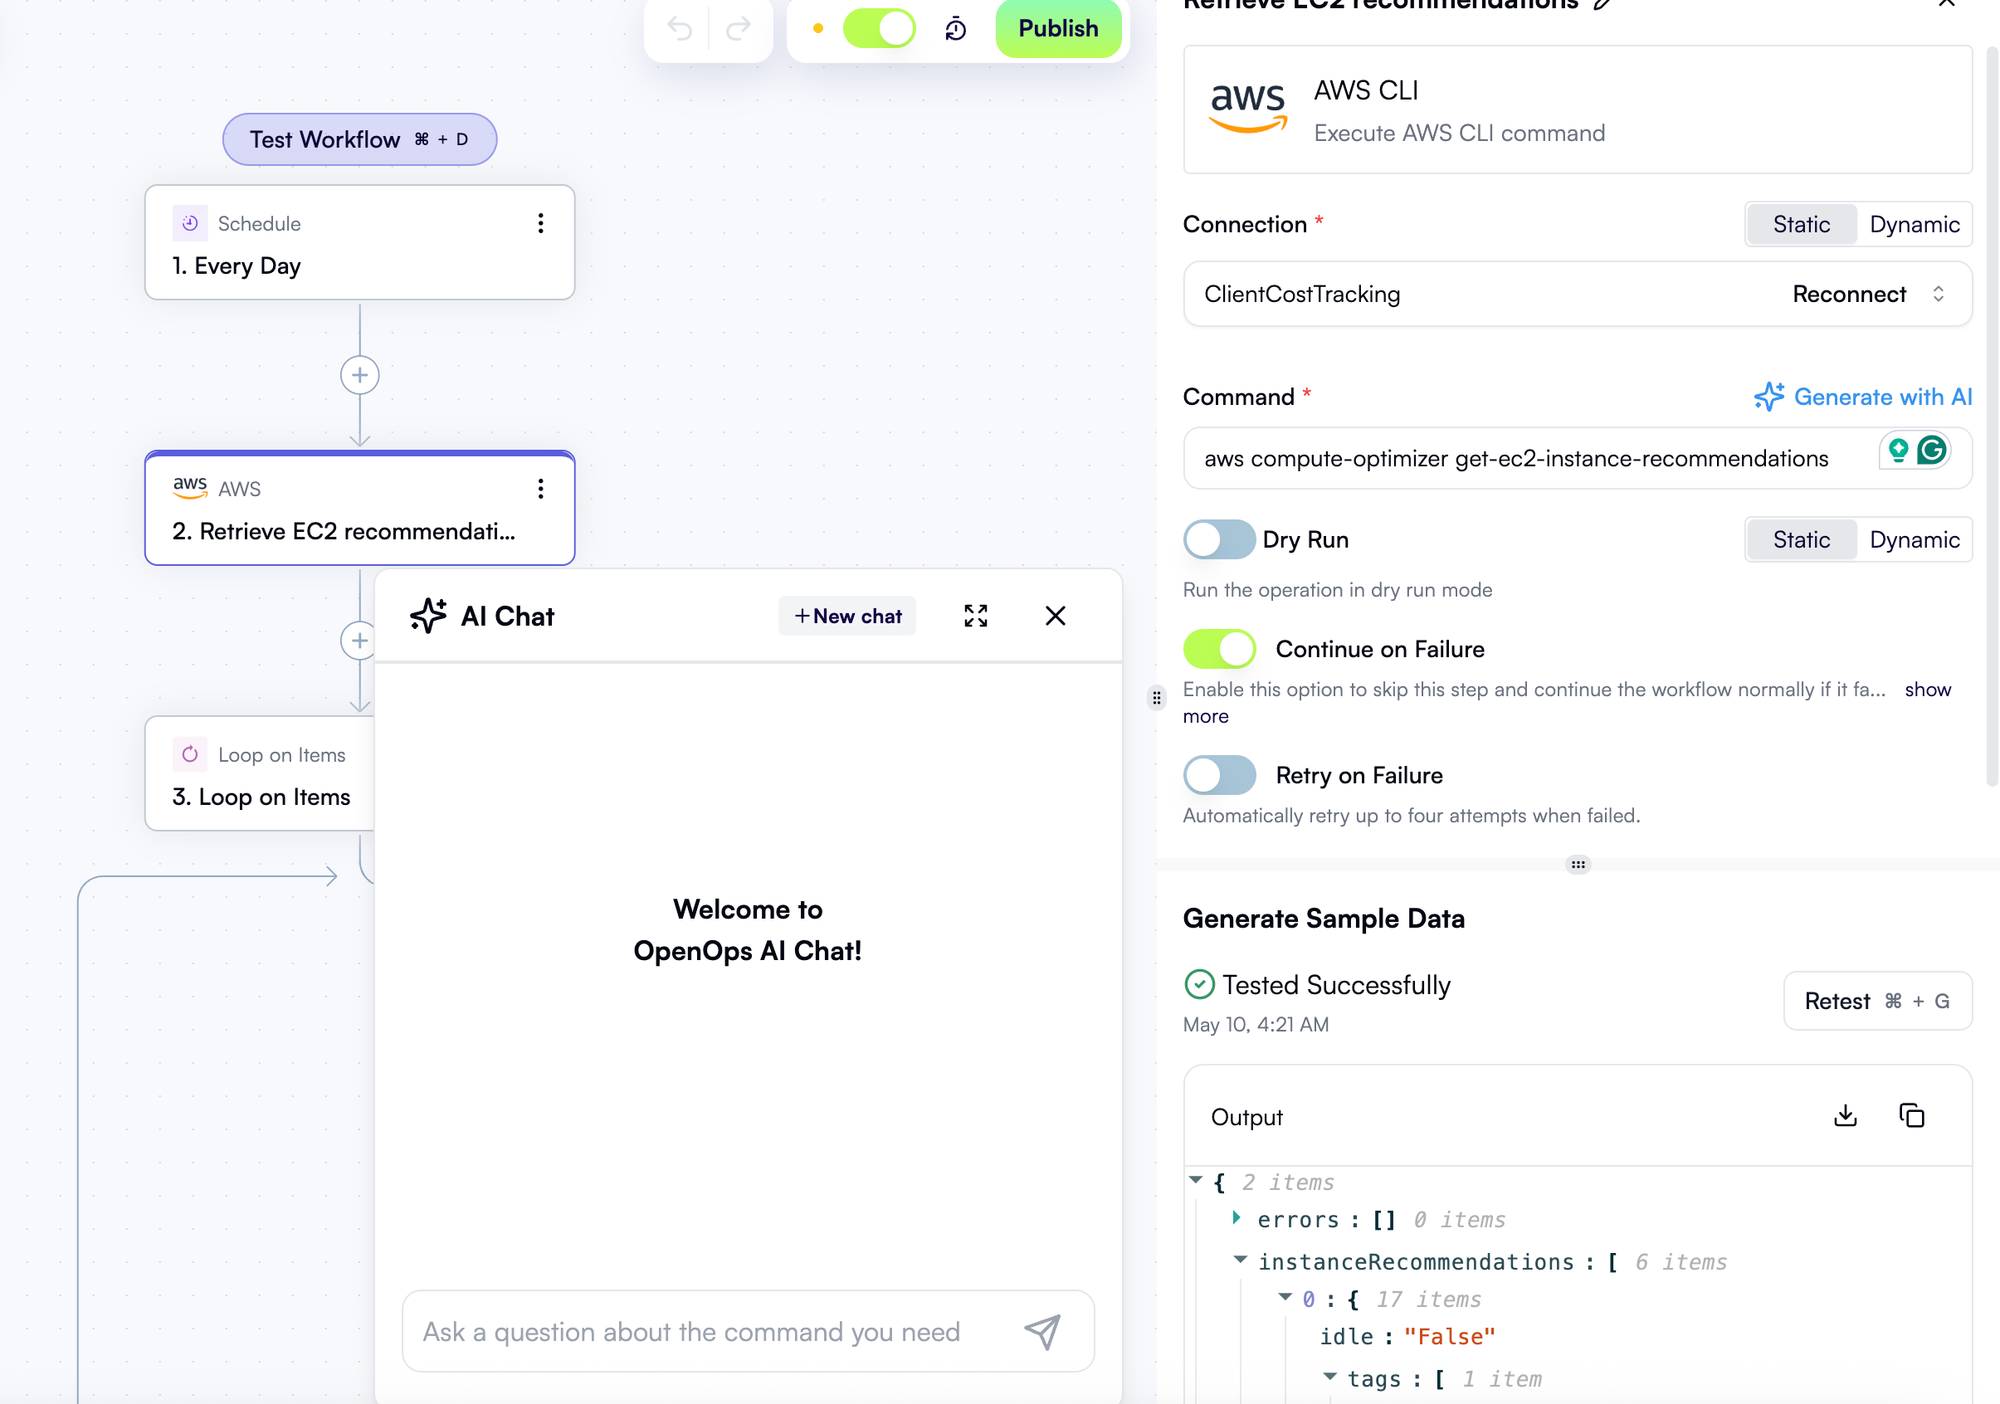
OpenOps gives us "Bring Your Own AI" (BYOAI) capability, allowing us to connect preferred AI models like ChatGPT or Claude to assist in building workflows and generating
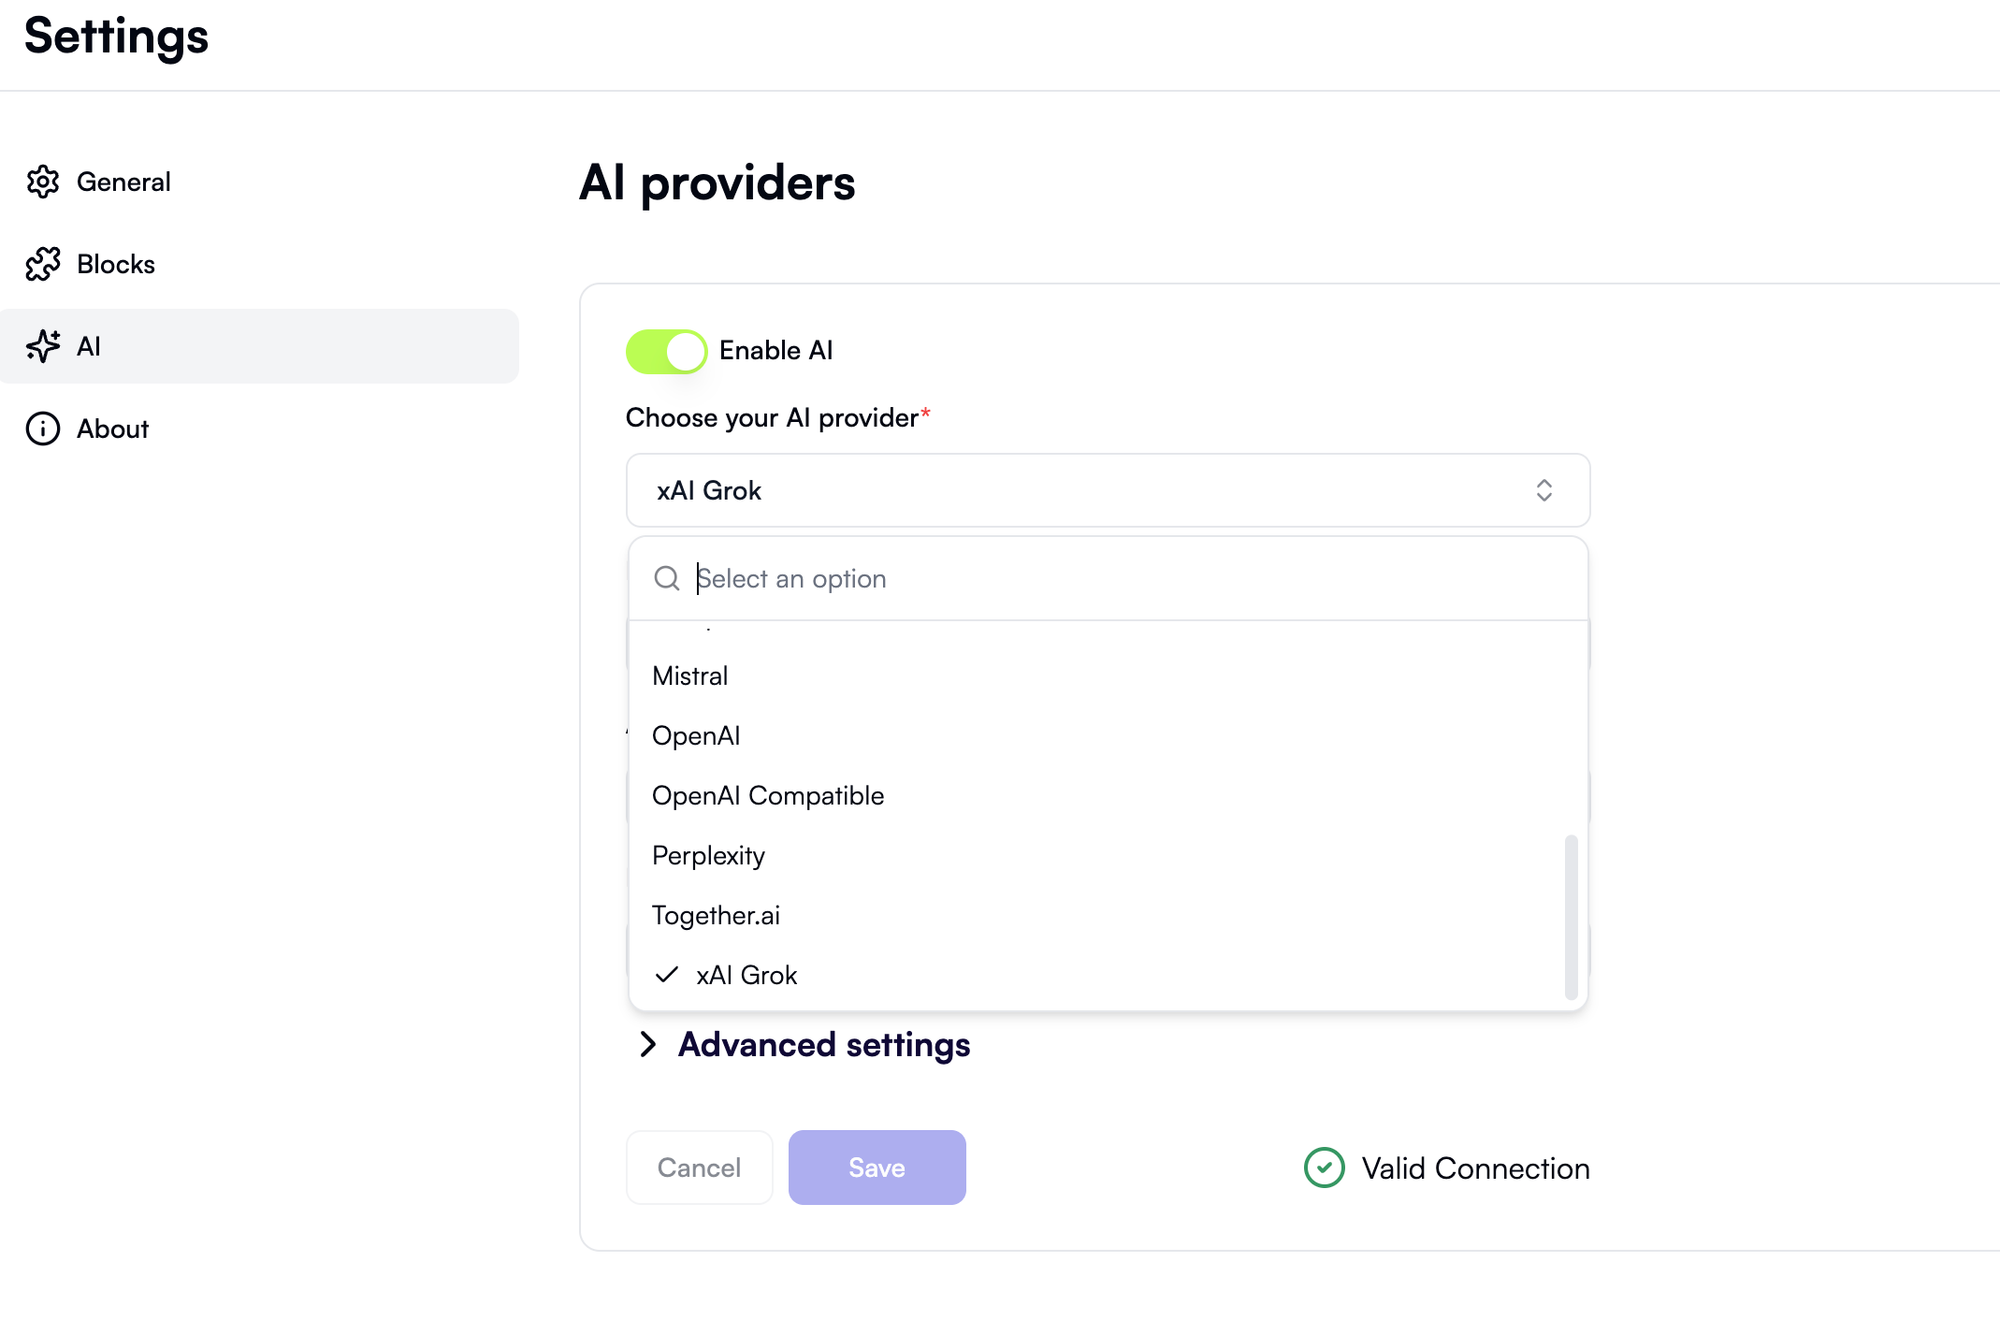
Use these models to assist in generating FinOps automations or responding to queries.
Workflow Scheduling and Monitoring in OpenOps
After customizing workflows in OpenOps, the next step is to schedule them and monitor their executions to ensure reliable automation and visibility into results.
⏰ Scheduling Workflows
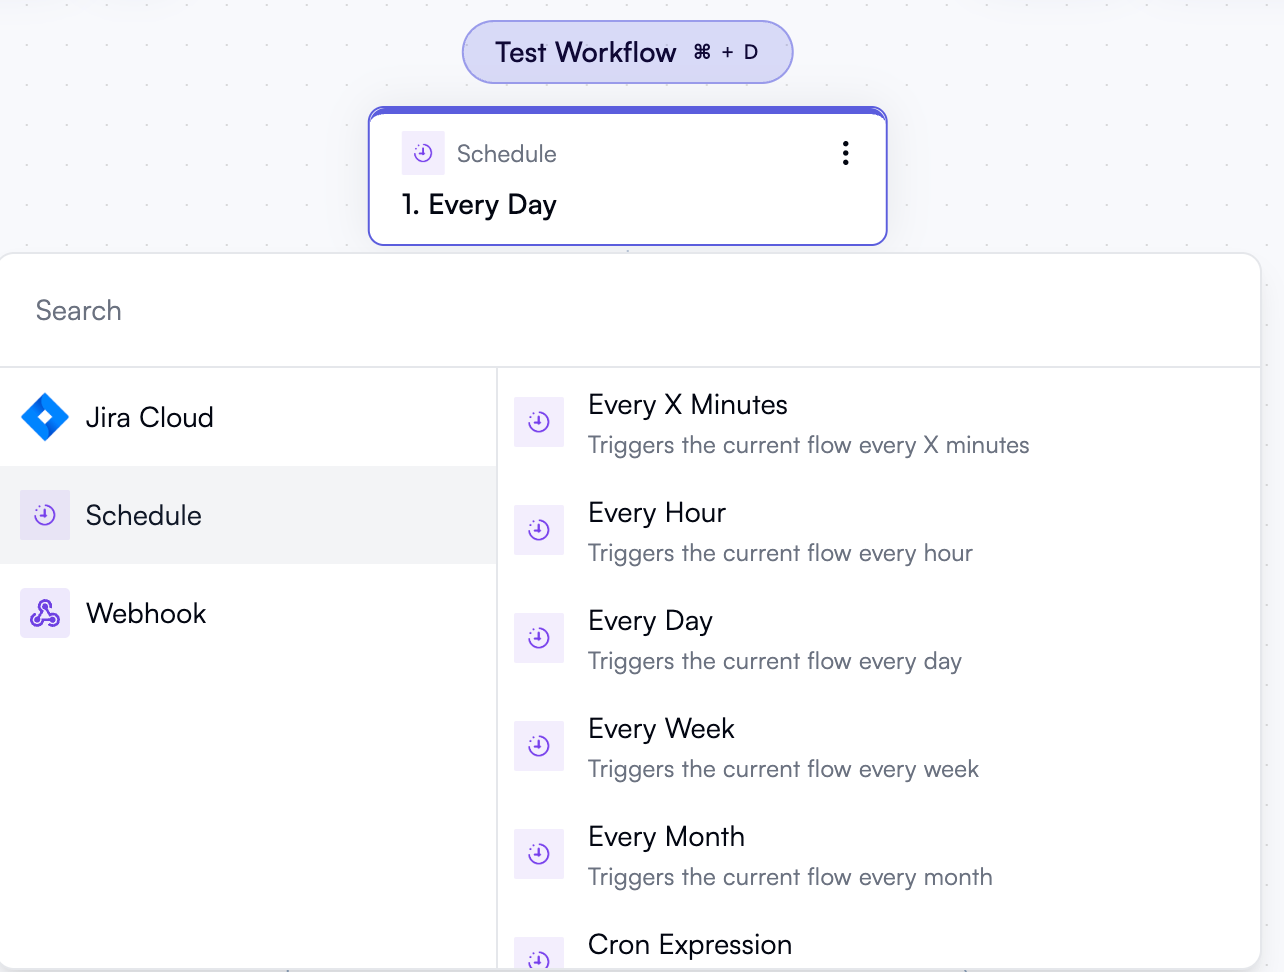
Types of Triggers
1. Time-Based Triggers
- Run workflows at fixed intervals using presets:
- Every X minutes, Hour, Day, Week, Month
- Custom Cron expressions (e.g.,
0 9 * * 1-5for weekdays 9 AM)
- Easy configuration through UI: set days, time, timezone
- Example: “Underutilized EC2” workflow scheduled at 7 AM UTC on weekdays
2. Event-Based Triggers
- Trigger workflows based on system or user events:
- Webhook (external HTTP call)
- Jira Issue Created/Updated
- CloudWatch Alarm (via webhook)
- Ideal for real-time FinOps actions like overspend alerts
Scheduling Steps
- Configure trigger → Publish workflow → Runs automatically
- Manual runs and tests are always possible
- Update schedule by editing the trigger and re-publishing
- Toggle workflow on/off via enable/disable controls
🔍 Monitoring and Run History
Runs Dashboard
- Navigate to Runs in sidebar for all workflow executions
- Each entry includes:
- Workflow name
- Start time
- Status (✅ Success / ❌ Failure)
- Filter by workflow, status, or date range
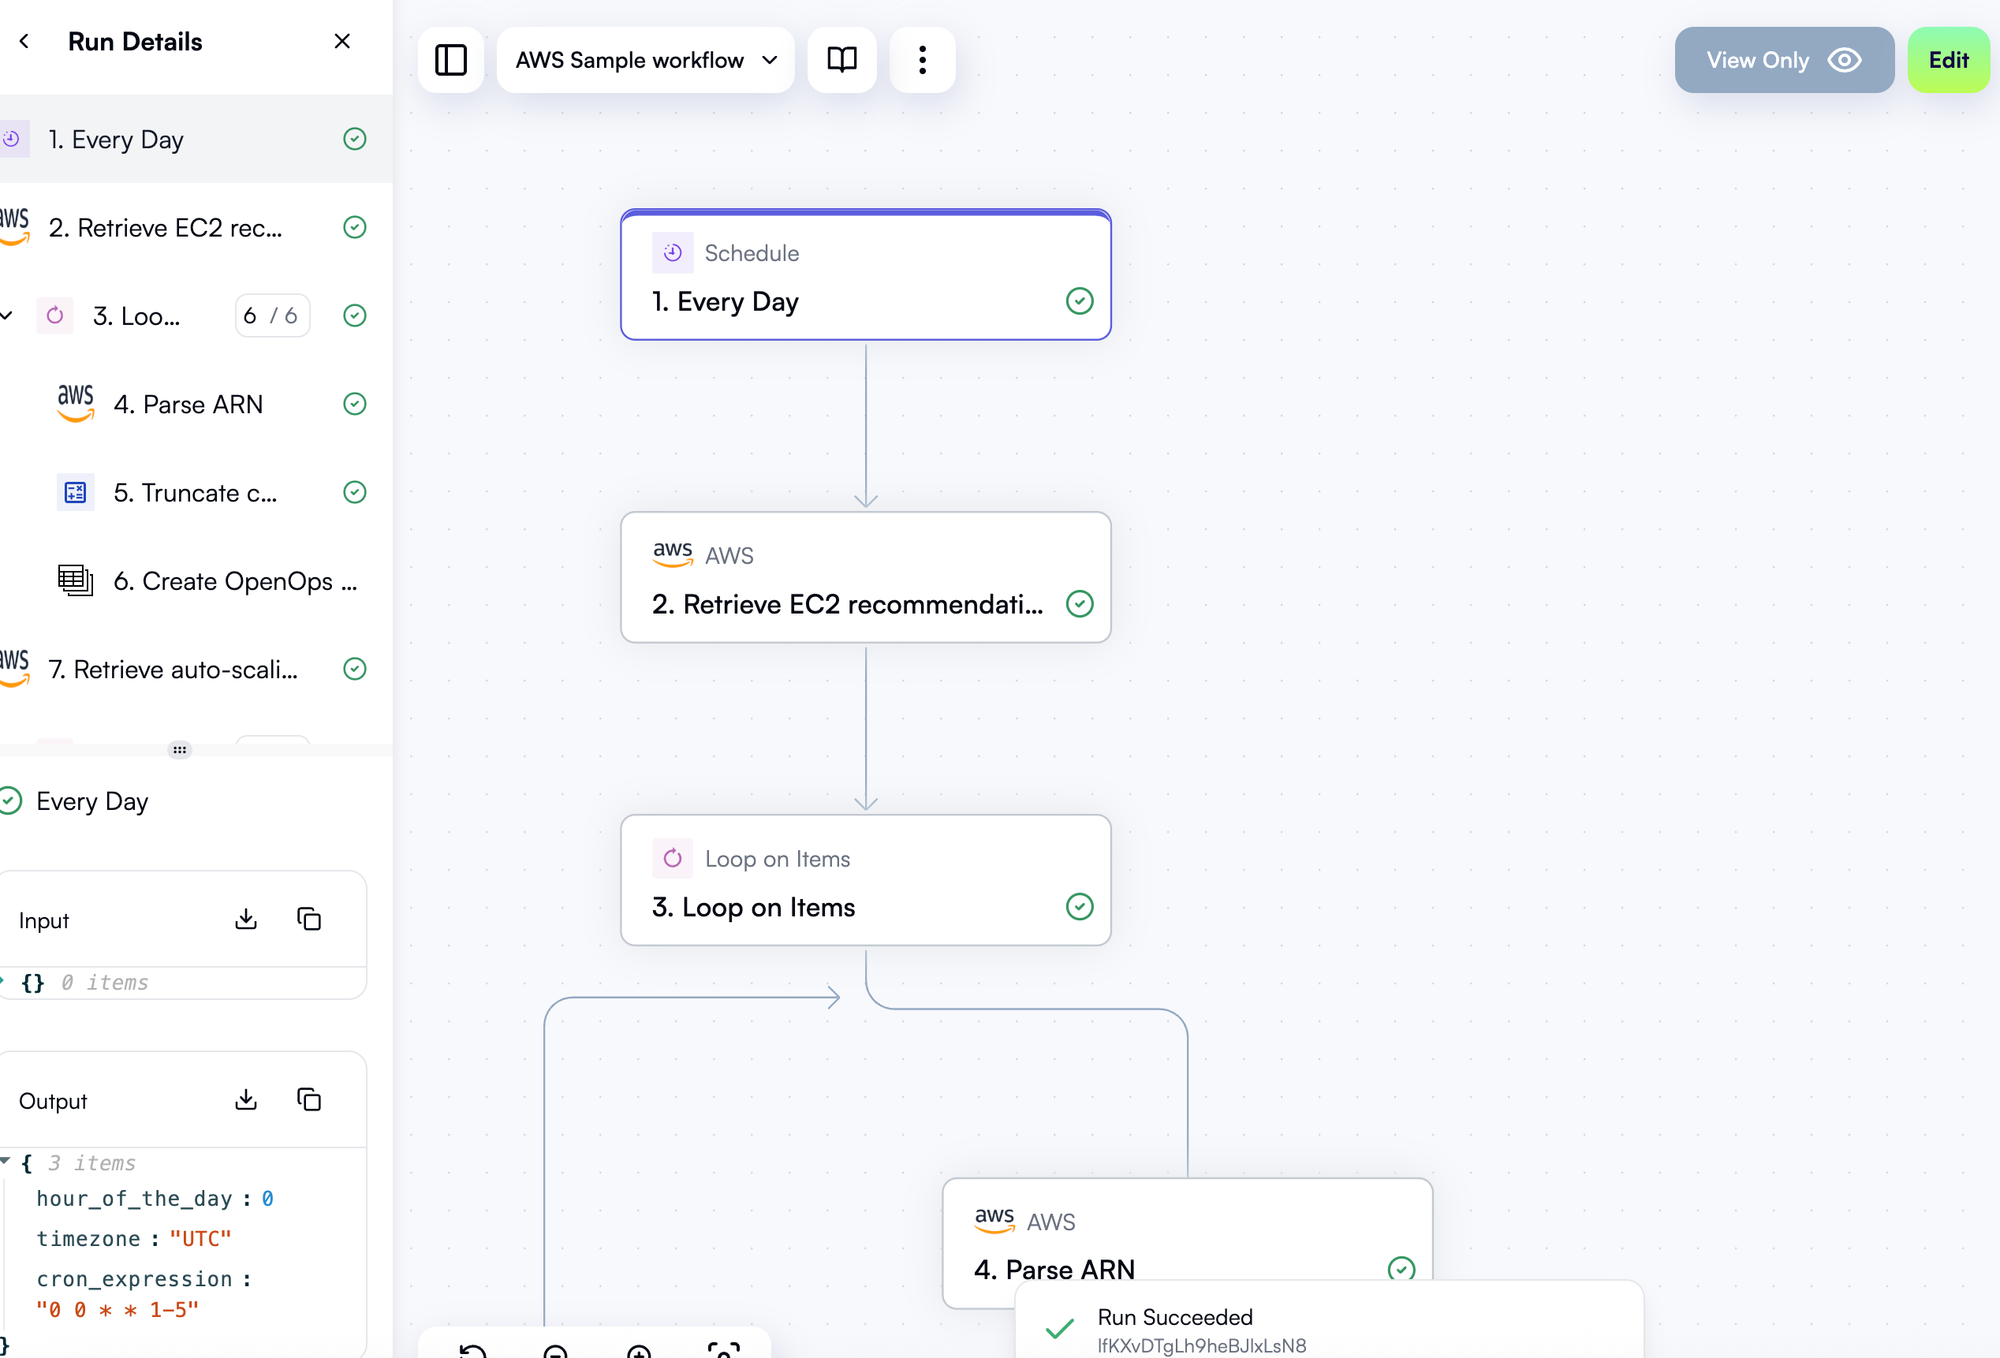
Run Details View
- Click on a run to open the frozen (read-only) view
- Visual diagram with color-coded step results
- Run Details pane shows outcomes per step
- Debugging:
- Click failed step ❌ to inspect inputs/outputs
- Errors are visible with messages/stack traces
Example:
- Rightsizing step failed due to EC2 being stopped
- Adjust workflow to check instance state before resizing
Logs from the Editor
- While editing a workflow, access recent runs via Run logs
- Useful for quick debugging and re-validation after changes
Additional Monitoring Features
- Add Slack/email steps for failure alerts
- No native alerting yet, but external monitors or error-handling workflows can be used
Workflow Versioning
- OpenOps tracks versions with each publish
- View, compare, or rollback to earlier versions
- Useful for tracing failures caused by recent changes
🧠 Best Practices Summary
- Scheduling: Choose appropriate triggers and time zones
- Monitoring: Use Runs view and logs for insight
- Troubleshooting: Leverage step-level error outputs
- Version Control: Restore working versions if needed
- Outcome Validation: Check Jira/issues/cloud impact to verify FinOps results
By following these practices, your OpenOps workflows become robust, traceable, and continuously improvable – ensuring your automation investments yield measurable returns.
Conclusion
OpenOps is a powerful platform that empowers developers and cloud engineers to implement FinOps practices through automation.
What We Covered
In this guide, we walked through:
- What OpenOps is
- How to install it across macOS, Windows, and Linux
- Connecting cloud accounts
- Running sample workflows
- Exploring the Templates Catalog
- Customizing workflows
- Setting up schedules with monitoring and reliability
❤️ Community-Driven Cost Optimization
One of the core strengths of OpenOps is its community-first approach:
- Templates are built on real-world best practices
- Users are encouraged to contribute their own workflow templates
- Sharing helps the broader FinOps community improve faster
🤝 Collaborate and Get Help
OpenOps offers an active Slack community where you can:
- Ask questions
- Get support from the OpenOps team
- Discuss use cases with other practitioners
📌 Pro tip: The GitHub repo is also open for issues and feature requests.
🔄 Automate to Scale FinOps
OpenOps transforms FinOps from a manual, reactive process into a proactive, continuous operation:
- Automate instance rightsizing, tagging enforcement, and reservation handling
- Codify policies into repeatable workflows
- Stay adaptable with an open, flexible architecture
🧠 Final Thoughts
- Explore the pre-built templates
- Build your own workflows
- Join the community to collaborate and share knowledge
OpenOps isn’t just a tool—it’s a movement for collaborative, automated FinOps. Embrace the automation. Save money. Scale smarter.
Happy automating, and welcome to the OpenOps community!


Member discussion